We’ve all faced that moment when staring at bare walls in a rental property feels like battling a creativity drought. After moving flats three times in London, I’ve learnt how temporary fixes and clever design choices can turn sterile rooms into cosy sanctuaries – no hammer required.
Lease agreements often limit what you can do, but that doesn’t mean settling for beige monotony. My favourite solutions? Lightweight frames with removable hooks, fabric hangings, and peel-and-stick wallpaper that adds personality without peeling paint. These tricks let you curate a space that feels authentically yours while keeping deposits safe.
In this guide, I’ll share practical methods I’ve tested myself – from upcycling second-hand finds to creating gallery displays with Command strips. You’ll discover how to refresh your surroundings without sparking awkward chats with your landlord.
Key Takeaways
- Damage-free solutions protect your deposit while allowing customisation
- Removable adhesives work better than nails for most surfaces
- Mix textures like woven baskets or fabric panels for visual interest
- Use existing furniture to inspire colour schemes and layouts
- Lightweight materials are easier to adjust and reposition
- Always check your tenancy agreement before making changes
Choosing Renter-Friendly Wall Decor
Ever felt stuck between wanting a stylish home and strict rental rules? I’ve been there – squinting at tenancy agreements while mentally rearranging blank walls. The secret? Start by understanding your lease limitations before picking up any decor.
Know Before You Hang
Your contract holds the first clue. Always check clauses about nails, adhesives, or paint changes. Some landlords allow small holes if patched properly. Others prioritise pristine walls. I once saved my deposit by using washi tape for lightweight frames instead of drilling.
Temporary Fixes That Stick
Modern removable solutions surprise me constantly. Adhesive strips hold up framed prints better than expected – my gallery wall survived two years without slipping. For bold statements, try geometric wall decals that peel off cleanly. A friend transformed her kitchen with floral-patterned removable wallpaper that left zero residue.
Pro tip: Test any adhesive on a discreet spot first. Those £3 hooks from the high street? Perfect for hanging woven baskets or fabric panels. Just remember – when in doubt, go lighter. Your future self will thank you during move-out inspections.
DIY Wall Art for Renters
Blank walls in rentals can feel limiting, but they’re actually blank canvases for temporary creativity. My favourite approach? Turning overlooked items into eye-catching features. A chipped serving tray became my retro-inspired wall clock, while leftover paint samples morphed into a geometric accent piece above the sofa.
Creative Projects for Personalisation
Start with what you’ve got. Old scarves stretched over canvas frames make brilliant fabric art – I’ve used vintage silk squares from charity shops. For texture lovers, try weaving scrap yarn through a wire grid. My current obsession? Framing pressed botanicals collected during walks, secured with repositionable tape for seasonal swaps.
Simple Materials and Techniques
You’d be surprised what works. Washi tape creates crisp lines for abstract designs that peel off cleanly. I’ve crafted entire gallery displays using mismatched frames from Gumtree, hung with damage-free hooks. Even coffee filters become sculptural wall flowers when dyed and layered. The trick is treating every piece as temporary – that freedom leads to your most inventive work.
Remember: your decor should evolve with you. Last winter, I turned spare wallpaper samples into interchangeable panels using Velcro strips. This flexibility lets your space grow without commitment, perfect for renters craving personal touches.
Personalising Your Space with Accent Walls
Your rental’s blandest wall could become its most intriguing feature with temporary design tricks. I transformed my kitchen’s empty corner into a Moroccan-inspired nook using removable tiles – zero commitment, maximum style. The key? Treating limitations as creative fuel rather than roadblocks.

Designing a Statement Wall
Start with removable wallpaper – modern options mimic everything from concrete to velvet textures. I’ve used botanical prints behind beds and geometric patterns in entryways. For depth, layer framed mirrors over your wallpaper. My go-to: Ikea’s Hovet mirror secured with heavy-duty adhesive strips.
Mixing Colours and Textures
Combine matte decals with glossy panels for visual intrigue. In my last flat, I paired embossed vinyl wall tiles with woven jute hangings. The contrast between sleek and organic textures made the space feel curated, not cluttered. Test combinations using fabric swatches or paint chips first.
| Material | Best For | Removal Tip |
|---|---|---|
| Removable wallpaper | Bold patterns | Use a hairdryer to loosen edges |
| Adhesive decals | Geometric accents | Peel slowly at 45° angle |
| Fabric panels | Soft texture | Clean wall with rubbing alcohol first |
| Vinyl tiles | 3D effects | Warm with heat gun if stubborn |
Small changes spark big transformations. Try framing leftover wrapping paper or using washi tape to outline “shelves”. My current inspiration? A friend’s hallway featuring sample-sized paint stripes – removable, rent-friendly, and utterly brilliant.
Updating with Removable Wallpaper and Decals
Nothing transforms a space faster than temporary surface treatments. I discovered this after covering my rental kitchen’s dated tiles with peel stick wallpaper that mimicked metro tiles – it lasted three years without bubbling and peeled off cleaner than a plaster.
Exploring Peel-and-Stick Options
Modern removable wallpaper feels like magic. My current favourite? A marble-effect vinyl that applied smoother than butter on toast. The trick is proper surface prep: wipe walls with diluted vinegar first. For corners, use a plastic smoother instead of metal tools to avoid tears.
Smaller wall decals work wonders too. I’ve framed motivational phrases above my desk using repositionable vinyl letters. When moving out, they peeled off like Post-It notes. Always test your chosen product behind furniture first – some cheaper adhesives leave ghost marks on matte paint.
Choosing Patterns for Your Room
Scale matters more than you’d think. In my boxy bathroom, oversized tropical leaves made the space feel grander. For narrow hallways, vertical stripes add height without overwhelming. Here’s my go-to pattern guide:
| Pattern Type | Best For | Pro Tip |
|---|---|---|
| Large-scale prints | Expanding small rooms | Use behind beds to create focal points |
| Geometric designs | Modern kitchens | Align shapes with existing tile lines |
| Subtle textures | Rental-friendly neutrals | Pair with bold accessories |
Mixing peel-and-stick wallpaper samples creates custom collages. I once combined six different botanical prints into a feature wall that looked professionally designed. When the landlord inspected, they never noticed the temporary adhesive – just complimented the “lovely decor”.
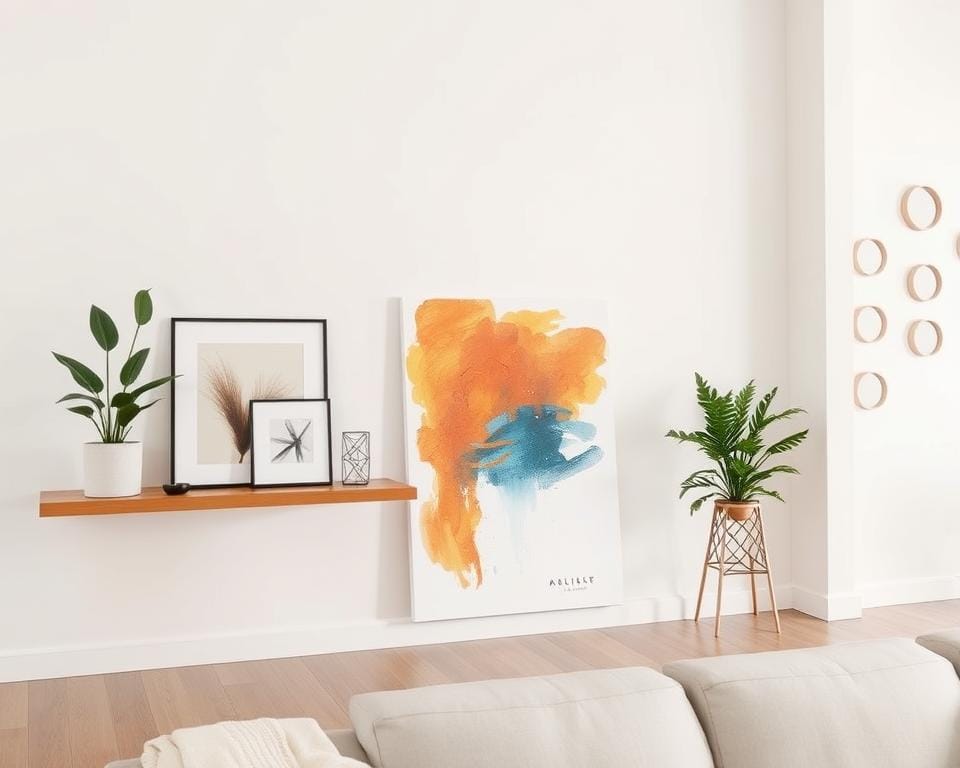
Creating Gallery Walls and Curated Displays
Curating a gallery display in a rental feels like solving a puzzle where every piece must click without glue. My secret? Combining lightweight frames, clever spacing, and damage-free hanging systems that let creativity flow freely. Start by laying your collection on the floor to experiment with arrangements before committing to walls.
Mixing Framed Art and Photographs
Balance is key when blending different pieces. I alternate between black-and-white photos and colourful prints in slim frames from H&M Home. For cohesion, use matching Command strip hooks across all items. My go-to formula: one large statement piece flanked by smaller complementary works.
Try these tips for harmonious displays:
- Align frame centres at eye level (150cm from floor)
- Mix horizontal and vertical orientations
- Leave 5-8cm between pieces
Integrating Mirrors and Unique Pieces
Mirrors double as functional artwork that brightens cramped spaces. I’ve hung an oval rattan mirror using heavy-duty adhesive hooks – it’s survived three moves. Incorporate unexpected items like vintage plates or woven trays for texture. Just ensure each addition serves the overall composition.
When styling my last gallery wall, I followed this ratio:
| Element | Percentage | Example |
|---|---|---|
| Framed art | 60% | Prints, paintings |
| Photographs | 25% | Personal snaps |
| Unique objects | 15% | Mirrors, wall sculptures |
Remember: your display should evolve. I swap out seasonal pieces using repositionable hooks, keeping the base layout intact. Start small – even three well-chosen items can create impact without overwhelming your space.
Hanging Décor Without Causing Damage
We’ve all held that picture frame mid-air, wondering if it’s worth risking our deposit. Through trial and error, I’ve perfected techniques for displaying treasures without damaging walls. The secret lies in smart adhesives and strategic planning.

Utilising Command Strips and Adhesive Hooks
Start with clean, dry surfaces – I wipe walls with surgical spirit first. For my heaviest piece (a 5kg mirror), I used four large Command strips arranged in a square pattern. Follow these steps for secure hanging:
- Press adhesive firmly for 30 seconds
- Wait one hour before attaching decor
- Remove vertically using the pull tab
Surprise fact: Those white hooks hold up to 7.5kg when installed correctly. I’ve hung floating shelves stacked with books using this method. Always check weight limits – mismatched adhesives cause most failures.
Minimising Holes and Marking Repairs
For unavoidable pinpricks, here’s my repair kit essentials:
| Damage Type | Solution | Pro Tip |
|---|---|---|
| Small holes | Toothpaste (matte walls) | Match texture with a damp sponge |
| Larger gaps | Polyfiller | Sand smooth once dry |
| Paint chips | Test pot from landlord | Blend edges with a makeup brush |
Document every change with timestamped photos. When moving from my last flat, I created a “wall log” noting each hook’s location. The agent praised my thoroughness – full deposit returned.
Remember: prevention beats repairs. Use painter’s tape to map layouts before committing. My current gallery wall took three mockups, but the final version required zero holes. Your walls stay pristine, and your creativity flows freely.
Adding Texture with Wood Panels and Textiles
Rental walls often lack character, but texture can change everything without permanent changes. My go-to strategy? Combining tactile materials that add depth while respecting tenancy rules. Here’s how to layer warmth using two renter-friendly elements.
Wood Slat Panels for a Warm Look
Thin plywood strips transformed my bedroom’s bland wall into a feature. I used adhesive mounting strips to secure lightweight slats in a vertical pattern. The result? A cosy, cabin-like feel that vanished at move-out. For best results:
- Choose unfinished wood for easy painting
- Cut panels to identical widths
- Sand edges to prevent snagging
Incorporating Hanging Textiles
Fabric introduces softness where hard surfaces dominate. I’ve hung vintage kilims using damage-free curtain rods that clamp onto existing rails. For smaller spaces, try these ideas:
| Material | Installation Method | Style Tip |
|---|---|---|
| Macramé | Command hooks | Pair with trailing plants |
| Linen panels | Tension rod | Layer behind shelves |
| Embroidered cloth | Velcro strips | Rotate seasonally |
Mixing materials creates visual intrigue. In my lounge, a woven wall hanging complements reclaimed wood shelves. Both items were secured using adhesive solutions from local hardware shops. Remember: test hanging methods with lighter fabric first before committing to heavier pieces.
Incorporating Plants and Natural Elements
There’s something magical about how a single houseplant can soften even the most impersonal rental. After transforming my own flat with greenery, I’ve found plants to be the ultimate renter-friendly upgrade – they purify air, boost moods, and adapt to any space without causing damage.
Using Hanging Planters as Décor
Vertical gardens solve two rental problems: limited floor space and strict wall rules. My favourite hanging solution? Macramé plant holders secured with adhesive hooks. They add bohemian flair while keeping surfaces clear. For kitchens, try magnetic herb planters that stick to fridge doors.
Low-maintenance options thrive best in rented spaces. My top picks:
| Plant | Light Needs | Watering | Care Tip |
|---|---|---|---|
| Spider Plant | Indirect | Weekly | Mist leaves |
| Snake Plant | Low | Fortnightly | Avoid overwatering |
| Pothos | Any | When dry | Trim long vines |
Boosting Ambience with Greenery
Grouping plants creates instant focal points. I cluster three varied-sized pots on windowsills using bamboo stands. In darker corners, a home-made terrarium with air plants adds life without sunlight. The trick is layering textures – mix feathery ferns with rubber plants’ glossy leaves.
For renters with minimal space:
- Propagate succulents in teacups on shelves
- Use wall-mounted test tube vases for cuttings
- Place trailing ivy atop kitchen cabinets
My bathroom’s humidity-loving peace lily thrives in a shower corner, proving every room benefits from plants. Start small – even a windowsill herb garden makes a home feel alive while keeping your deposit safe.
Conclusion
Personalising a rented space doesn’t have to mean choosing between style and your security deposit. Through trial and error in my own flats, I’ve discovered that temporary solutions can create lasting impressions without leaving a trace.
Removable wallpaper lets you experiment with bold patterns, while Command strips securely hold gallery displays. Even fabric hangings add warmth when paired with damage-free hooks – my go-to for quick texture upgrades.
The real magic happens when you realise lease restrictions fuel creativity. My favourite projects – from geometric decals to floating shelves – all share one trait: they protect walls while reflecting personal taste.
Don’t be afraid to mix techniques. Try layering peel-and-stick tiles behind framed mirrors, or refresh seasonal looks with repositionable wall decals. Your space should evolve as you do.
Got a brilliant solution that saved your deposit? I’d love to hear how you’ve transformed your temporary home. Share your clever decor wins – let’s prove rented spaces can brim with personality and still hand back spotless walls.