I still remember the smell of golden syrup warming in a Devon kitchen — that sticky, caramel warmth that made me fall for this treacle tart on a rainy weekend. I write as Gemma, and I want the baking to feel like a friendly trip: simple kit, clear steps, and a filling that wobbles just so.
Expect a crisp shortcrust base and a glossy, lemon-kissed filling that balances sweetness with brightness. I’ll show why golden syrup matters, how to stop the base going soggy, and the small timings that make each slice vanish from the table.
We’ll keep techniques easy — no fancy tools — and I’ll share little notes I use in my own cookbooks. Ready to bake a slice of proper British comfort that feels like a sunny hug?
Key Takeaways
- Golden syrup gives the authentic flavour — don’t substitute lightly.
- A flaky shortcrust keeps the base crisp; chill the dough before blind-baking.
- Use lemon zest and a touch of cream or egg for a glossy, set filling.
- Simple kit and small steps make this perfect for a weeknight bake.
- Optional lattice tops add charm — but a plain top works just as well.
Why this traditional treacle tart belongs in your baking rotation
Whenever I need a dependable dessert, this traditional treacle tart is the first I reach for.
Five pantry staples, little fuss and a reliably delicious result — that is why I bake it again and again. The filling uses golden syrup, fresh breadcrumbs and lemon; the syrup gives deep caramel notes and the lemon keeps each bite bright.
I prefer homemade texture to shop-bought versions every time. Golden syrup is indispensable — don’t swap it for corn syrup if you want the right flavour.
- I keep it in rotation because the method fits busy days — make pastry ahead and finish with a quick bake.
- It travels well and slices cleanly — perfect for picnics, potlucks or a quick teatime treat.
- It suits seasons: cosy with custard in winter or bright with berries in summer — a versatile part of my baking list.
Classic Treacle Tart Recipe
If you want a baking win with few ingredients, this tart never lets me down. I keep the shopping list tight so you can bake in one go.
Ingredients for the pastry
What I use:
- Plain flour and a pinch of salt.
- Cold butter, diced — or a little lard mixed in for extra flake.
- Ice-cold water to bring the dough together.
Ingredients for the filling
Keep it simple:
- Golden syrup and a touch of treacle if you like a darker flavour.
- Fresh white breadcrumbs (I pulse day-old bread).
- Grated lemon zest, a splash of lemon juice, double cream and one egg.
Essential kit
Measure and organise before you start. That saves faff.
- A 22–23cm fluted tart tin with removable base.
- Baking parchment and baking beans (or dried pulses) for blind baking.
- A small saucepan to warm the syrup and a fork for pricking the base and beating the egg.
| Item | Why it matters | Tip |
|---|---|---|
| Plain flour | Gives structure to the pastry | Weigh it for consistency |
| Cold butter / lard | Creates flaky layers | Keep it as cold as possible |
| Golden syrup | Main sweet binder for the filling | Warm gently so it pours |
| 22–23cm tart tin | Size gives neat slices | Loose base makes release easy |
Make the shortcrust pastry for a buttery, flaky base
There’s a calm, almost meditative rhythm to rubbing fat into flour — it keeps me centred before the oven heats up. I guide you step by step, with gentle reminders to keep everything cold and calm.

Rub or pulse flour, butter and a pinch of salt
Pop the flour and a pinch of salt into a food processor and pulse. Add cold butter (or a little lard) in cubes and pulse until the mix looks like coarse crumbs.
Bring together with cold water, wrap and chill
Add ice-cold water a spoon at a time. Stop as soon as the dough clumps — too much handling makes it tough. Shape into a disc, wrap in cling film and chill for 20–30 minutes so the gluten relaxes and the butter firms.
Roll the dough, line the tart tin and prick the base
On a lightly floured surface, roll the dough a little larger than your 22–23cm tart tin to allow for shrinkage. Ease it into the tin without stretching, press the corners and trim the rim neatly.
Prick the base with a fork to vent. If your kitchen is warm, pop the lined tin into the fridge for 10 minutes before blind baking — it helps prevent shrinking.
Quick tips
- Keep butter and water very cold.
- Use light, swift movements — pastry likes a gentle touch.
- Chill time is simple patience that pays off in crisp edges.
| Step | Why it matters | Short tip |
|---|---|---|
| Pulse flour & salt | Even seasoning and base texture | Quick bursts for control |
| Add cold butter | Creates flaky layers | Keep cubes cold |
| Introduce ice-cold water | Joins mixture without warming | Add a spoon at a time |
| Chill under cling film | Rest and firm the dough | 20–30 minutes in fridge |
Blind bake the tart shell for crisp edges
Blind baking is the simple trick that prevents a soggy bottom. Blind baking locks the pastry structure so the filling can be lush without turning the base limp. Fancy an easy trick? Preheat the oven to 190°C (170°C fan) so the pastry meets steady heat from the start.
Preheat oven, line with parchment and fill with beans
Keep the chilled shell in a loose-base tin on a baking tray — it makes sliding in and out fuss-free. Line the pastry with parchment and fill right to the rim with baking beans to support the sides.
Bake minutes until pale golden, then reduce oven temperature
Bake for 10–15 minutes until the base looks set. Carefully lift out the parchment and beans, then return the tin and bake a further 8–10 minutes until very pale golden.
- I preheat the oven so the pastry hits immediate heat and sets its shape.
- Line the shell and fill with beans to keep the tin steady and the sides supported.
- Bake minutes until set, remove beans, then dry the base until pale golden — not brown.
- If your next step needs gentler heat, reduce oven temperature before adding the filling.
| Step | Why it matters | Tip |
|---|---|---|
| Preheat to 190°C / 170°C fan | Sets pastry quickly and prevents shrinkage | Use a baking tray for easy handling |
| Line with parchment & fill with beans | Supports sides and keeps flat base | Fill to the rim for even support |
| Bake 10–15 then 8–10 minutes | Dries base while protecting edges | Aim for pale golden, not dark brown |
Prepare the treacle filling with golden syrup and lemon zest
Start with patience: low heat in a small pan lets the syrup become silky without catching. Use a gentle flame and stir as the golden syrup loosens—your cue is a glossy, pourable flow and a soft caramel smell.
Remove the pan from the heat and, if you like, stir in a small knob of butter until it melts. Off the heat, mix in the fresh breadcrumbs, the lemon zest and a splash of lemon juice. The bowl will smell bright and slightly warm.
Leave the mix to sit for five minutes so the breadcrumbs swell and the mixture thickens. In a separate bowl, beat the egg with the cream until smooth. Fold this into the warm syrup mix quickly so it combines without cooking the egg.
- Aim for a thick but pourable mixture. If too loose, add a spoonful more breadcrumbs and wait a minute.
- Keep the pan nearby—the residual heat helps everything marry while you work.
- The lemon lifts the sweetness; taste and tweak the lemon to keep a bright edge.
| Action | What to look for | Why it matters |
|---|---|---|
| Warm golden syrup over low heat | Silky, pourable syrup; soft caramel scent | Prevents burning and keeps flavour clean |
| Add breadcrumbs, lemon zest & juice off heat | Fragrant, thickened mixture | Breadcrumbs absorb syrup; lemon balances sweetness |
| Beat egg with cream and fold in | Smooth, glossy batter | Ensures set filling with a tender texture |
| Adjust thickness | Thick but spoonable | Gives a slice that holds shape and stays moist |
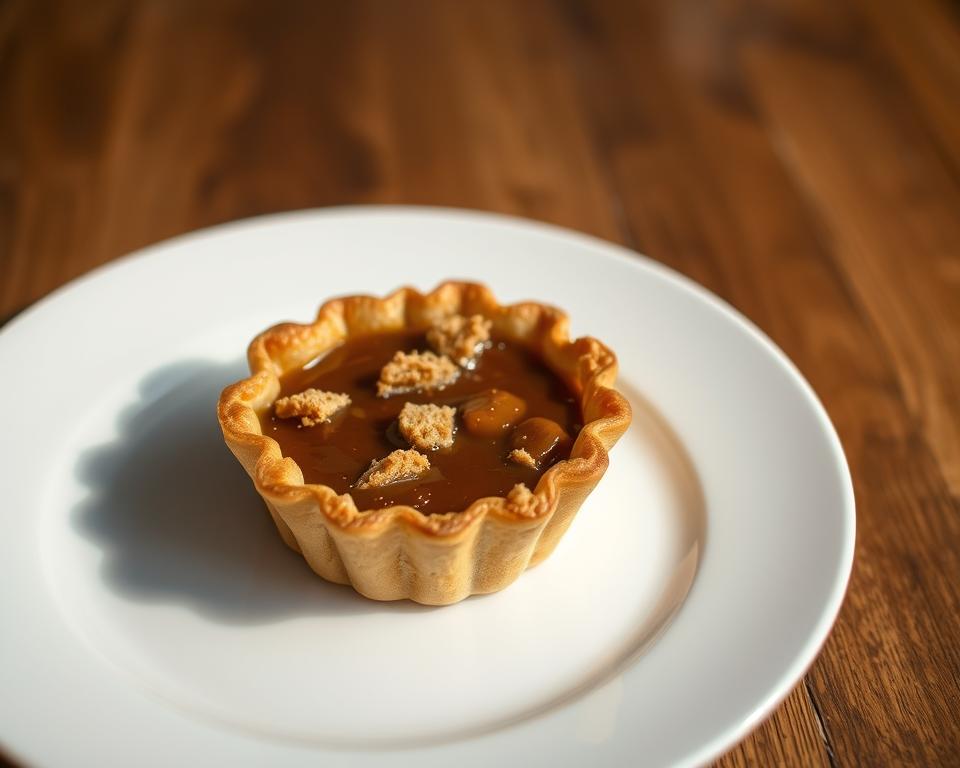
Assemble the tart and bake until the filling is set
Heat meets pastry here; the filling sets best when both are warm together. I pour the hot syrupy mix straight into the warm pastry case — heat on heat helps the centre bind without shocking the base.

Pour, add a lattice if you like, then bake
If you want a lattice, chill thin strips of pastry first and weave them on top for a neat bakery finish. Chill helps the strips hold shape so they crisp rather than slump.
Timing and oven guidance
Slide the tart onto the middle shelf so the oven cooks evenly. Set the oven temperature to about 180–190°C (160–170°C fan).
- I usually bake minutes until the pastry is golden and the centre still gives a soft wobble when nudged.
- Don’t overcook — the filling firms as it cools, and that gentle wobble is the sign of success.
- If the rim browns too fast, shield the edge with a collar of parchment.
| Action | What to look for | Why it matters |
|---|---|---|
| Pour hot filling into warm shell | Even set and good texture | Prevents a soggy bottom and helps the filling marry with pastry |
| Place on middle shelf | Even colour across the top | Steady heat gives a glossy finish without over-browning |
| Check wobble at end of minutes | Soft centre with golden surface | Gives a tender, moist slice after cooling |
Cool, slice and serve with classic accompaniments
A warm tart straight from the oven invites the best kind of small moments. Give it a few careful minutes so the filling can settle and the base keeps its shape.
Remove the tart from the oven, cool in the tin, then release
Cool in the tin for about five minutes so the centre firms and the pastry relaxes. After a short rest, run a small knife around the rim and gently remove the side. Slide the loose base onto a plate and admire that syrup glow.
Serve warm with simple, indulgent sides
Serve warm for the best texture — a silky centre and crisp pastry make each bite sing. I love it with clotted cream, warm custard, whipped cream or a scoop of vanilla ice cream. A light dusting of lemon zest lifts the taste without adding more sugar.
- If you baked ahead, refresh slices for a few minutes in a low oven to bring back the crisp edge.
- A handful of raspberries or a spoon of crème fraîche balances richness on brighter days.
| Accompaniment | Why it works | Serving tip |
|---|---|---|
| Clotted cream | Rich, silky contrast to the sweet filling | Spoon on warm slices just before serving |
| Custard | Classic comfort that soaks the base slightly | Serve warm in a jug for pouring |
| Vanilla ice cream | Hot-and-cold contrast refreshes the palate | Place a small scoop at the side |
| Fresh berries | Bright, tart notes cut through richness | Scatter a few for colour and freshness |
Texture and taste tips for a truly traditional treacle tart
Small texture tweaks make a big difference when you want each slice to hold its shape and sing on the palate. I share practical, tried tips in plain language — little moves that yield big results.
If the mixture looks runny, stir in a spoon or two of breadcrumbs and then set aside for a minute so they absorb the syrup. That pause lets the mixture thicken without overbaking.
- If your mixture feels loose, add a spoonful of breadcrumbs and set aside — give them a moment to drink up the syrup.
- Blind bake fully; a pale golden base resists moisture and keeps the pastry crisp beneath the rich filling.
- Pour the filling in hot — warm meets warm for a cleaner set and neater layers.
- Use fresh breadcrumbs; they hydrate evenly and keep texture soft rather than gritty.
- Brighten sweetness with a little lemon zest; it adds fragrance and balance without thinning the mix.
- For a firmer slice, add a touch more breadcrumbs; for a softer set, reduce them slightly.
| Issue | Quick fix | Why it works |
|---|---|---|
| Runny filling | Add breadcrumbs, rest 60–90 seconds | Breadcrumbs absorb syrup and firm the mixture |
| Soggy base | Blind bake until pale golden, pour hot filling | Dry shell resists moisture and keeps crisp layers |
| Too sweet | Grate a little lemon zest over the top | Brightens flavour and lifts the overall taste |
Jot what you love in your treacle tart recipe — your notes make repeat bakes consistent. Keep pastry cold and the filling warm; those opposites make magic every time.
Storage, reheating and make-ahead notes
A little planning turns last night’s slice into a tea-time victory the next day. Cool the tart completely on a wire rack before you box it — that keeps steam from softening the base.
Store in an airtight container in the fridge for up to two days. Chill swiftly so crumbs stay tender and the syrup stays glossy. If you need a longer pause, set aside an unfilled baked shell for a few hours and fill on the day you want to serve.
Make pastry ahead by wrapping the dough in cling film and chilling for 20–30 minutes or longer. The cold dough is easier to roll and yields flakier edges when baked.
Reheating and refresh tips
- Warm slices gently in a low oven so the pastry crisps and the centre loosens without drying.
- Cool on a rack before placing in the fridge to avoid condensation forming under the lid.
- A light drizzle of warm syrup perks up day-two slices nicely — try it just before serving.
| Action | When to use | Why it helps | Quick tip |
|---|---|---|---|
| Cool completely | Immediately after baking | Prevents moisture build-up and soggy base | Use a wire rack for 30–60 minutes |
| Store airtight in fridge | Up to two days | Keeps filling stable and flavours bright | Wrap loosely to protect edges |
| Chill pastry dough in film | 20–30 minutes or overnight | Firms butter for flakier layers | Use cling film and flatten into a disc |
| Reheat low and slow | Before serving leftovers | Crisps pastry and warms syrup without drying | 150°C / 130°C fan for 8–10 minutes |
Troubleshooting common bake issues
Nothing spoils a bake faster than shrinking edges or a split finish — but the fixes are simple. I offer friendly, practical steps so you can enjoy the process and the pudding again.
Crust shrinking at the edges
If the pastry pulls away from the rim, avoid stretching when you line the tin. Lift and press the dough gently into place.
Chill the lined case before you bake and prick the base with a fork so steam can escape. Fill fully with baking beans to support the sides.
Over-browned top and pale base
A browned top with a pale base usually means the shell needed longer blind baking. Bake on the middle shelf and use a sturdy tray for even heat.
- If the filling boils too hard, reduce oven temperature a notch.
- Patch any cracks with a scrap of pastry if syrup looks likely to leak under the crust.
- If unsure, give the base another minute or two of blind bake — crisp beats soggy every time.
| Issue | Quick fix | Why it helps |
|---|---|---|
| Shrinking edges | Chill case; avoid stretching | Keeps pastry firm and in place |
| Pale base / brown top | Longer blind bake; middle shelf | Evens heat for a cooked base |
| Syrup leaks | Patch cracks; dry base first | Stops syrup escaping and softening base |
Keep notes in your treacle tart recipe — your oven’s quirks become easy to navigate next time you are baking.
Conclusion
When the oven timer clicks and the filling still gives a soft wobble, you know you’ve done something right. This is a simple, honest recipe: a shortcrust base, a blind bake, warm golden syrup stirred with breadcrumbs and lemon zest, then enriched with egg and cream and baked until set.
Preheat oven, line the case and blind bake so the pastry stays crisp. Use cold butter and water in the dough, prick the base with a fork, and pour the warm filling into a warm tin.
Bake just until that gentle wobble appears, cool briefly, then serve warm with cream, custard or ice cream. Tweak the lemon, try a lattice, and share the slices — good baking is meant to be part of life.