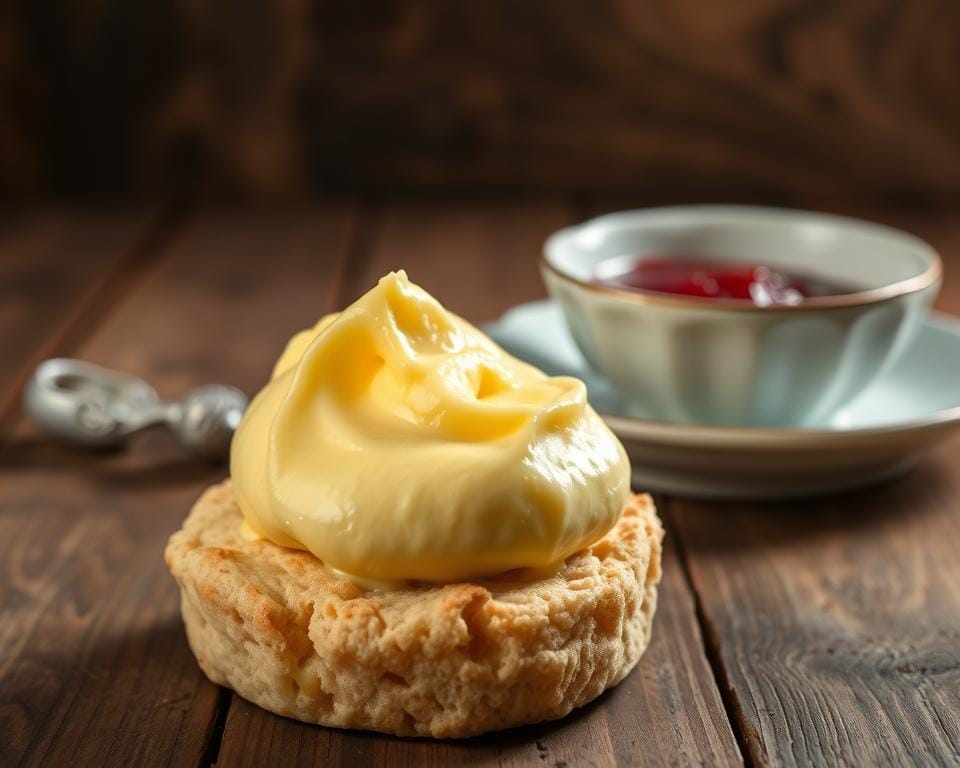
There’s something magical about slathering thick, velvety clotted cream onto a warm scone. After years of enjoying this treat during trips to Devon and Cornwall, I decided to recreate it in my own kitchen. Turns out, you don’t need fancy equipment or rare ingredients – just patience and a trusty oven.
My first attempt taught me a few things. Use full-fat double cream – anything lighter won’t form that golden crust. A shallow dish works best, allowing gentle heat to work its magic over hours. I’ll walk you through the surprisingly simple steps I’ve perfected, from preheating your oven low and slow to skimming off that luxurious top layer.
This method creates a batch that’s perfect for elevating weekend brunches or impressing guests. Once you’ve tasted freshly made clotted cream, the shop-bought version just won’t compare. Let’s dive into the details so you can start your own cream tea tradition.
Key Takeaways
- Full-fat double cream is essential for achieving the proper texture
- Low oven temperatures (around 80°C) create the signature crust
- Shallow ceramic or glass dishes allow even heat distribution
- 12-hour cooling period separates the thickened cream from liquid
- Lasts up to five days when stored properly in the fridge
A Taste of Tradition: Exploring Clotted Cream
My first encounter with proper cream tea happened in a thatched-roof café near Dartmoor. The ritual felt almost sacred – warm scones split by hand, strawberry jam glistening like rubies, and that luxurious golden layer crowning it all. Locals still debate whether to spread jam or cream first, but everyone agrees this treat embodies West Country hospitality.
Dating back centuries, the method of slowly heating rich dairy originated in Devon and Cornwall’s farming communities. Families would skim the thickened crust from pans left by hearths overnight. Today, this technique connects us to generations who valued patience and quality over convenience.
| Region | Serving Style | Texture |
|---|---|---|
| Devon | Cream first, then jam | Denser, buttery |
| Cornwall | Jam first, then cream | Silkier, lighter |
During my travels, I’ve tasted versions from village fetes to posh London hotels. Nothing matches the depth of flavour in batches made with care, where you can almost taste the grassy fields where the cows grazed. Supermarket tubs often lack that toasted, caramelised note – the soul of proper clotted cream.
Creating it yourself isn’t just about ingredients; it’s a nod to culinary heritage. Each spoonful carries stories of dairy maids, afternoon teas, and sun-drenched Devonshire hills. Why settle for mass-produced when you can savour tradition?
Homemade Clotted Cream Recipe
Transforming simple dairy into a luxurious topping is easier than you might think. My early attempts taught me that quality heavy cream makes all the difference – opt for pasteurised, not ultra-pasteurised varieties. The latter simply won’t develop that signature crust we’re after.
Here’s what works every time: pour four cups of thick double cream into a wide ceramic dish. Bake uncovered at 80°C (gas mark ¼) for exactly 12 hours. I initially struggled with oven hotspots until I started using the middle rack – now I get even golden patches every time.
After baking, let it cool completely before refrigerating overnight. You’ll wake up to two distinct layers: the prized thickened top and liquid beneath. Gently skim off the golden crust using a slotted spoon – that’s your prize.
Through trial and error, I’ve found letting it chill for a full 24 hours creates the dreamiest texture. Don’t rush this part! Once you’ve nailed the basics, try adding a pinch of sea salt or vanilla to make it uniquely yours.
Understanding the Origins of Clotted Cream
The story of this velvety dairy delight begins in Southwest England’s rolling farmlands. I first grasped its cultural significance while chatting with a fourth-generation dairy farmer near Torrington. Her family’s methods hadn’t changed in 150 years – just fresh milk, gentle heat, and time.
From Farmhouse Hearth to Modern Oven
In Devon and Cornwall, resourceful farmers perfected slow-cooking techniques using cast-iron pans over smouldering embers. They’d simmer rich milk for hours, skimming the thickened crust to stretch precious resources. Today’s oven method mirrors this patience – low temperatures working magic while you sleep.
During a blustery autumn visit to Bodmin Moor, I watched a local baker recreate this process. Her grandmother’s dish, blackened from decades of use, produced cream with caramel undertones no factory could replicate. “Rushing ruins it,” she warned. “Like good cheese or wine, it needs its time.”
A Star of Afternoon Rituals
By the Victorian era, clotted cream became synonymous with leisurely scones and gossip-filled tea parties. I’ve relished this pairing everywhere from Plymouth tearooms to Chelsea embankments. The cream’s lush texture elevates even basic baked goods – a fact I tested using my mum’s slightly dry scones last Easter.
What began as practical preservation now symbolises West Country pride. Each golden spoonful connects us to sunlit pastures and generations who valued quality over haste. Isn’t that worth waiting twelve hours for?
Essential Ingredients and Equipment
Perfecting this dairy delicacy starts with choosing the right components. After testing countless variations, I’ve learned that fat content dictates success – skimp here, and you’ll end up with lacklustre results. Let’s break down what truly matters in your kitchen setup.

Key Ingredients with High Fat Content
Double cream with at least 55% milk fat forms the foundation. My local cheesemonger swears by Guernsey breeds – their rich, golden-hued dairy adds incomparable depth. For those wanting extra indulgence, I’ve had brilliant results blending in a knob of unsalted West Country butter during the skimming stage.
Water rarely features in traditional methods, but some modern recipes use a splash to adjust consistency. If you go this route, ensure it’s filtered and ice-cold. When pairing with jam later, balance sweetness by opting for tart preserves – my neighbour’s homemade blackcurrant version cuts through the richness beautifully.
Must-Have Kitchen Tools
A wide ceramic dish (20cm diameter minimum) allows proper heat distribution. I ruined my first batch using a metal tin – stick to oven-safe glass or stoneware. For stovetop methods, a heavy-bottomed pan prevents scorching. Keep a slotted spoon and muslin cloth handy for skimming and straining.
Through trial and error, I’ve found a digital thermometer invaluable. Maintaining precise temperatures makes the difference between velvety layers and grainy textures. Don’t forget airtight containers for storage – proper chilling preserves that signature silkiness for up to five days.
Oven Method for Slow-Baked Perfection
Mastering the oven technique transformed my kitchen into a dairy workshop. The secret lies in gentle heat working its magic while you carry on with your day. I’ve found this approach delivers consistent results, especially when using a wide, shallow pan that maximises surface area.
Setting the Optimal Oven Temperature
After several trials, I stick to 80°C (175°F) – hot enough to encourage thickening but cool enough to prevent scalding. My first attempt at 90°C created grainy patches, proving precision matters. Use an oven thermometer to verify your settings, as dials often lie.
Baking for 12 Hours
Timing is non-negotiable here. I set reminders to avoid peeking – every door opening drops the temperature. The cream develops a caramel-speckled crust after 12 hours, while the liquid beneath stays silky. For best texture, resist the urge to rush this stage.
I learned this the hard way when a power cut interrupted my third batch. The result? A disappointingly thin layer that wouldn’t spread properly. Now I use a battery-powered oven timer as backup. Once cooled, the thickened top keeps its lush consistency for up to five days when refrigerated in airtight containers.
This method rewards patience with rich, spoonable luxury. Whether you’re prepping for afternoon tea or weekend treats, that golden crust makes every minute worthwhile.
Stove Top Technique for Quick Clotted Cream
When time’s tight but cravings strike, my stovetop method saves the day. This approach cuts preparation from twelve hours to thirty minutes – perfect for spontaneous cream tea emergencies. While it demands more attention than oven baking, the payoff comes faster than you’d think.
Monitoring Consistency on the Stove Top
I discovered this method during a hectic week when my oven was occupied. Pour double cream into a heavy saucepan, keeping the heat low-medium. Constant stirring prevents scorching – I use a silicone spatula to scrape the bottom every 30 seconds. Within minutes, you’ll notice subtle thickening and golden flecks forming.
Timing matters here. Remove from heat the moment it resembles custard thickness. I learned this the hard way when distracted by a boiling kettle – ten seconds too long created unwanted graininess. Let it cool completely before chilling overnight. The result? A luscious layer that rivals traditional recipes in richness.
For best results:
- Choose a pan with thick base to distribute heat evenly
- Maintain gentle bubbles rather than rapid simmering
- Skim foam during cooking for smoother texture
My last-minute experiment became a regular hack. While nothing beats the oven method’s caramelised depth, this version satisfies urgent cravings beautifully. Just don’t multitask – burnt dairy smells linger longer than your patience!
Slow Cooker Approach: A Minimal Effort Method
Discovering new kitchen hacks keeps my culinary experiments exciting. While testing alternative methods, I stumbled upon a game-changer for busy days – using a slow cooker. This hands-off technique delivers that coveted velvety texture while you tackle other tasks.
Here’s how it works: place a heat-resistant bowl filled with double cream inside your slow cooker. Pour water around it until halfway up the bowl’s sides – about 2.5cm depth works best. Set to low heat and let it work undisturbed for 12 hours. The gentle, consistent warmth encourages perfect thickening without babysitting.
Maintaining Ideal Water Levels
Through trial and error, I’ve learned water management makes or breaks this method. Too little leads to uneven heating, while excess moisture risks diluting your mixture. Check every three hours during the first attempt – top up with warm water if needed, but avoid disturbing the cream’s surface.
| Method | Active Time | Texture | Best For |
|---|---|---|---|
| Slow Cooker | 5 mins setup | Silky with butter notes | Multi-tasking days |
| Oven | 30 mins monitoring | Denser crust | Weekend projects |
| Stovetop | 25 mins stirring | Lighter consistency | Quick cravings |
The slow cooker’s magic lies in its steady environment. Unlike oven hotspots, this method produces uniform golden flecks across the surface. After cooling, you’ll notice subtle cream butter undertones – a happy accident from the indirect heat that’s become my favourite nuance.
For newcomers, I recommend using a clear glass bowl to monitor progress without lifting the lid. Once mastered, this technique becomes your secret weapon for effortless indulgence. Set it before bed, and wake up to a breakfast spread worthy of a country estate.
Achieving the Perfect Texture and Flavour
Getting that dreamy consistency where silkiness meets satisfying clots requires finesse. During my Devon food festival stint, I tasted dozens of versions – some too runny, others dry as chalk. The magic happens when you balance technique with intuition.

Balancing Creaminess and Clots
Pour cream into your chosen baking dish with purpose – too fast, and you’ll trap air bubbles. I’ve found a steady stream from 15cm height creates the ideal base. After baking, let it cool until the top firms like crème brûlée but still jiggles slightly when nudged.
Skimming requires surgical precision. Tilt the dish and use a slotted spoon to drain liquid without disturbing the thickened layer. Reserve some whey – mixing a teaspoon back in enhances spreadability for cream scones.
| Baking Dish Material | Heat Distribution | Clot Formation |
|---|---|---|
| Ceramic | Even | Uniform clots |
| Glass | Moderate | Delicate crust |
| Stoneware | Slow | Deeper caramelisation |
Storage makes all the difference. Transfer your golden prize to an airtight container immediately – exposure to fridge odours dulls those delicate caramel notes. For peak flavour, let it sit at room temperature 20 minutes before serving with warm cream scones.
Personal tweak: A dash of orange zest in the airtight container overnight adds citrusy brightness. Just remove before serving to keep the tradition alive with your signature twist.
Serving Suggestions for Cream Tea and More
I’ll never forget the afternoon I accidentally paired my golden-topped creation with lemon curd instead of jam. The tart citrus cut through the richness beautifully, sparking a world of serving possibilities. While tradition reigns supreme, don’t be afraid to play with flavours and formats.
Pairing with Scones and Jam
For classic cream teas, split warm scones horizontally – never vertically! The wider surface holds more of that luscious dairy layer. I alternate between strawberry and blackberry preserves depending on the season. A proper cuppa with full-fat milk completes the ritual, balancing the sweetness.
Texture matters most here. Serve your dairy delight slightly chilled (5°C) but let it warm up for 10 minutes before spreading. This maintains its structural integrity while allowing easy application. Too cold, and it’ll tear your scone; too warm, and it becomes runny.
| Occasion | Pairing | Temperature Tip |
|---|---|---|
| Afternoon Tea | Classic scones + Earl Grey | 5°C, rested 10 mins |
| Brunch | Blueberry pancakes + maple syrup | Room temperature |
| Dessert | Poached pears + cinnamon | Slightly warmed |
Beyond scones, try dolloping it on gingerbread or folding into vanilla ice cream. The high fat content lends velvety texture to puddings and crumbles. Last Christmas, I stirred leftover liquid from skimming into my mincemeat pastry – added incredible moisture without altering flavour.
Whether you’re hosting a garden party or treating yourself midweek, keep it simple. Quality ingredients shine brightest when treated with respect. That accidental lemon curd pairing? Now a firm favourite at my summer gatherings.
Tips for Storing and Preserving Your Clotted Cream
Proper storage turned out to be the secret to my best batches. After a disastrous week where I lost half a dish to fridge odours, I developed these fail-safe methods. Always use an airtight container – that porous ceramic dish from section three won’t cut it here.
Keep your golden top layer separated from the liquid beneath. I leave a slotted spoon in the container for easy skimming. This prevents sogginess and maintains that luxurious texture for up to seven days.
Freezing’s tempting, but trust me – it ruins the silky mouthfeel. Instead, use leftover liquid within two days. My favourite hack? Substitute it for milk in scone recipes – adds incredible richness without waste.
Check your ingredients balance weekly. If the top layer starts weeping, blot gently with kitchen paper. For longer freshness, avoid temperature swings. I store mine on the fridge’s middle shelf, far from the door.
When using the stove method leftovers, remember they’ll separate faster. Skim daily and transfer to smaller containers as you go. That caramelised crust deserves proper care – treat it like the treasure it is!
Personal Insights and Journey with Clotted Cream
My culinary journey with this dairy delight began unexpectedly in a cramped Paris flat. Armed with a second-hand oven and determination, I discovered that traditional methods transcend borders. What started as homesickness for Devon cream teas became a delicious obsession – one that taught me resourcefulness.
Early experiments tested my patience. I once forgot a batch in the fridge for three days, only to find it had developed complex caramel notes. Another time, a neighbour’s borrowed container sparked a friendship over shared scones. These happy accidents shaped my approach to cooking – perfection isn’t mandatory, but curiosity is essential.
Reflecting on Past Culinary Adventures
Living abroad forced improvisation. When my Swiss refrigerator couldn’t fit standard dishes, I used ramekins – creating charming individual portions. A cracked casserole lid led to covering dishes with foil, which oddly improved crust formation. Each challenge became a lesson in adaptability.
Sharing results proved equally rewarding. I’ll never forget the raised eyebrows at a Barcelona potluck when I unveiled my signature treat. By sunset, guests were scraping the container with biscuit crumbs. Back home, my postman now expects a jarful every Christmas – his wife adores it on mince pies.
Through it all, ordinary kitchen tools proved their worth. That chipped ceramic dish from the charity shop? Still my trusted cooking companion. Your journey might start with a humble fridge shelf and mismatched bowls – embrace it. The real magic lies not in fancy gear, but in the stories you’ll gather along the way.
Conclusion
Creating this rich topping at home feels like unlocking a delicious secret. Whether you choose the oven’s slow magic or a quicker stovetop approach, the process rewards patience with velvety results. Remember: shallow dishes ensure even heat from top to bottom, while full-fat dairy forms that signature golden crust.
Each serving offers more than indulgence – it’s a connection to centuries-old traditions. I’ve found batches made with care have richer flavour than shop versions, plus you control the calories. Share your creations with friends alongside warm scones, and watch their faces light up.
Keep these tips handy: 12-hour baking times yield the best texture, and airtight storage preserves freshness. Every detail matters, from the dish’s bottom thickness to balancing jam sweetness. Why not try your first batch this weekend? I’d love to hear how your servings turn out – leave your twists in the comments!
Armed with this information, you’re ready to craft teatime magic. However you enjoy it – slathered thickly or dolloped delicately – savour each spoonful. After all, good things come to those who wait (and whisk creatively).