You want a foolproof way to get crisp pastry and a juicy centre without faff, and this post will show you how to bake a proper pasty at home with confidence.
I’m Gemma — I travel, I cook, and I share the little tricks that save you time and improve flavour. I’ll guide you through simple shortcrust, how to dice beef and veg so everything cooks evenly, and how a good chill and a tidy crimp stop leaks.
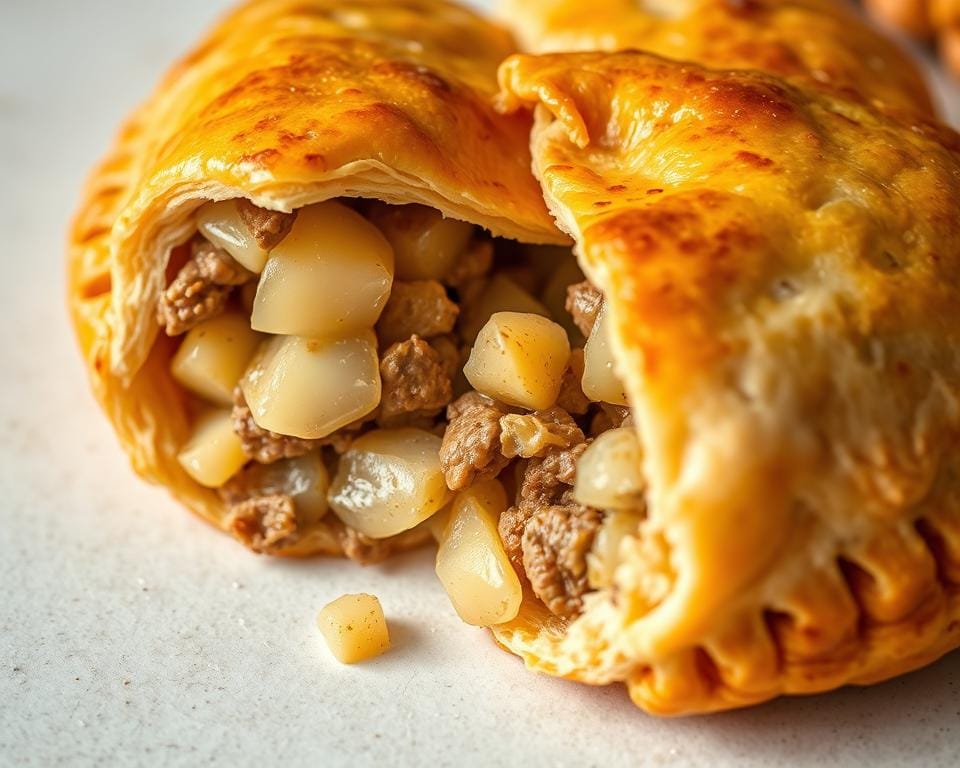
Follow a few clear steps and you’ll be slicing into a golden turnover filled with beef, potato, swede and onion — dotted with butter so it makes its own gravy. I share freezing and reheating tips too, so your batches stay crisp and ready when life gets busy.
Key Takeaways
- Shortcrust makes crisp pastry: keep the dough cold and rest it well.
- Dice beef and veg small so the filling cooks evenly and stays juicy.
- Dot butter and add a light sprinkle of flour to prevent a soggy base.
- Seal with a firm crimp — it’s practical and traditional for handling.
- Freeze baked or unbaked; add 15–20 minutes if baking from frozen.
A warm intro to a true Cornish comfort
Imagine holding a golden parcel of food that warms your hands and your mood — that’s what a good pasty does. I love Cornwall’s food culture because it prizes honest ingredients and clever, practical touches.
Here’s what makes these pasties special: they have protected status, so a genuine cornish pasty follows strict rules — made in Cornwall, filled raw with beef, potato, swede and onion, and sealed with a side crimp. Miners once used that crimp as a handle to keep arsenic off their food.
- Keep it simple: lean beef (skirt or sirloin) and waxy potatoes hold their shape when baked.
- Little decisions matter: dice small, dot with butter, and chill your pastry so it bakes crisp.
- Bake with confidence: 40–50 minutes at 180°C/350°F and a steam slit in the top.
In this post I’ll walk you through each step — friendly, clear and practical so you can crimp and bake with confidence at home.
Traditional Cornish Pasty Recipe
A short list of ingredients and a calm work surface make baking simple and satisfying. I keep the kit small so you can focus on the bits that matter: cold dough, neat filling and a reliable crimp.
Key ingredients (authentic and simple)
Beef (skirt or a good steak), potato, rutabaga (swede) and onion. Season with salt pepper and dot each pasty with unsalted butter. A light sprinkle of flour into the filling helps the mixture make its own gravy without soggy pastry.
Essential kit
Keep it basic: a food processor or a bowl to place flour and rub in fat, a rolling pin and a sturdy baking tray. Use a plate to trace an 8‑inch pastry circle for each pasty.
Pastry versus filling: keeping balance right
Aim for even proportions so the edges meet cleanly and the centre cooks in the same minutes as the crust. Too much filling stresses the edges; too much pastry feels bready. Chill the dough and keep the filling diced small for even cooking.
At a glance: steps from dough to golden crust
- Make shortcrust pastry, rest the dough.
- Roll circles, layer potato, vegetables and beef.
- Season, dot with butter, sprinkle a little flour, seal and crimp.
- Slit the top and bake 40–50 minutes at 180°C/350°F until golden.
| Component | Ratio | Prep tip |
|---|---|---|
| Pastry | Thin but sturdy | Keep cold; rest before rolling |
| Filling | Balanced meat to veg | Dice small; season simply |
| Bake time | 40–50 minutes | Middle shelf; look for bubbling vent |
Make the shortcrust pastry
A good shortcrust begins with cold butter and a light, patient touch. I guide you through two ways to make the dough so you can pick the fast kitchen trick or a calmer, hands-on route.
Food processor method
Place flour and salt in the food processor and pulse with cold cubes of unsalted butter until the mix looks like coarse breadcrumbs. Little pea-sized bits give a flaky crust.
With the motor off, add water a tablespoon at a time and pulse only until the dough just clumps. Don’t overwork it — stop as soon as it holds together.
By hand: a gentler approach
Rub the butter into the flour with your fingertips until the mix is sandy. Add cold water slowly and bring the dough together with a light touch. The less you handle it, the more tender the crust.
- Shape the dough into a flat disc to chill quickly.
- Chill for 1–3 hours so gluten relaxes and the butter stays cold.
- Tip for warm kitchens: chill bowl and tools first, and add only enough water to make a shaggy dough.
| Step | Why it matters | Quick tip |
|---|---|---|
| Pulse or rub in fat | Creates flakes in the pastry | Keep butter cold |
| Add water sparingly | Prevents a tough dough | One tablespoon at a time |
| Chill dough | Improves handling and final crust | Wrap as a flat disc |
Prepare the filling
Begin with neat prep: the right cuts and a tidy dice make all the difference. I keep this practical — clear cutting cues, sizes that cook evenly, and a simple seasoning that lets the ingredients sing.
Choose the meat: lean skirt steak is my go-to for flavour and texture, but trimmed sirloin or ribeye also work well. Whatever you pick, trim away gristle and big seams of fat first.
Cut beef across the grain
Always cut beef across the grain. Slice the steak against the fibres, then into small pieces about 1 cm. This makes a lean cut feel tender and ensures the meat cooks evenly inside the pastry.
Dice vegetables small for even baking
Dice potato, rutabaga (swede) and onion to roughly 1 cm cubes. Waxy potato holds its shape best — floury ones can fall apart and make the filling stodgy.
- Season simply with salt and pepper; keep the flavours clean.
- Do not add liquid — dot butter later to give the filling moisture.
- Keep the mixture chilled if prepping ahead; cold filling helps the pasty keep its shape when crimped.
| Item | Cut / Size | Why it matters |
|---|---|---|
| Skirt steak / sirloin / ribeye | Trimmed; cut across grain into 1 cm pieces | Small pieces cook evenly and stay tender |
| Potato (waxy) | Dice ~1 cm | Holds shape; avoids mushy filling |
| Rutabaga (swede) & onion | Dice ~1 cm | Cooks at same rate as meat and potato |
| Seasoning | Salt & pepper only | Lets meat juices and veg sweetness shine |
Assemble and crimp the pasties
With chilled dough on the board, use a plate to trace an even 8‑inch circle. Roll to that guide so every pastry circle is the same size — they’ll bake uniformly and finish together.
Place a neat mound of the raw filling on one half of the circle. Season with a pinch of salt and pepper between layers, dot with a little butter and dust a light sprinkle of flour over the mixture.
Brush a thin line of water or beaten egg around the rim. Fold the circle over and press the edges to seal. Turn the join onto its side and crimp along the side in a steady rhythm — pinch, fold, pinch — to form a tidy rope that keeps juices in.
Keep the edges clear of stray filling so the seal holds. If the dough tears, patch with a scrap and crimp over it. Cut a small slit in the top to vent steam; this helps the pasty stay crisp rather than burst.
Quick checklist
- Use a plate to get an even circle each time.
- Season between layers and dot with butter for gravy.
- Moisten the edges with water or beaten egg before sealing.
- Crimp on the side for a proper finish; vent the top with a small slit.
- Space pasties on the tray to allow even browning.
| Action | Why it matters | Tip |
|---|---|---|
| Roll to 8‑inch circle | Even bake and tidy edges | Use a plate as a guide |
| Dot with butter & flour | Forms a light gravy; protects pastry | Small dots and a dusting only |
| Crimp on the side | Keeps juices sealed; iconic finish | Pinch-fold pattern; steady rhythm |
| Vent the top | Prevents soggy top or burst seams | One small slit per pasty |
Bake, time and temperature
Heat the oven and watch closely — the right start makes all the difference to a golden crust.
Preheat to 180°C/350°F so the shortcrust pastry hits steady heat and lifts rather than slumps. Cut a small steam slit in the top of each pasty before they go in; this lets moisture escape and keeps the top crisp.

Brush each one with a light beaten egg wash for a glossy, even colour. Place the tray on the middle shelf and close the oven door. Keep it shut for the first 25 minutes so the crust can set.
- Bake for 40–50 minutes — check at 40 minutes and judge by colour: a deep golden crust and a savoury smell are your clues.
- If the top browns too fast, tent with foil and give it the extra minutes it needs so the filling cooks through.
- Use a standard metal tray for a crisper base; avoid thick insulated sheets if you want browning.
| Action | Why it matters | Timing cue |
|---|---|---|
| Preheat oven | Ensures pastry lifts immediately | At least 15 minutes before baking |
| Egg wash | Gives golden, glossy top | Before baking; optional second wash at 20–25 minutes |
| Rest after baking | Juices settle so slices don’t spill | Allow ~10 minutes before serving |
Let them rest for around 10 minutes once out of the oven — the steam settles and the beef juices thicken. Reheat in a hot oven to keep the pastry crisp if you’re serving later. In baking, colour and aroma tell you more than time alone — learn to trust them.
Pro tips and troubleshooting
A few simple checks in the kitchen will stop leaks and keep every edge neat. I share the small fixes I use so you get a crisp bite every time.
Choose waxy potato — they hold their shape and stay in neat pieces rather than collapsing into the mixture. Dice all pieces small and even; tidy cuts pack closer and protect the pastry from sharp points.
- Layer smartly: put onion first, then potato and swede, with the meat on top. This keeps sharp veg edges from piercing thin dough.
- Light flour trick: sprinkle a little flour over the filling with dots of butter — it catches juices and helps form a glossy, firm crust.
- Seal without stress: don’t overfill; leave a clean rim so edges close easily. If a tiny tear appears, patch with a thin offcut and press gently.
- Season simply: use salt and pepper sparingly so the filling stays balanced and the beef flavours shine.
| Problem | Fix | Why it works |
|---|---|---|
| Weeping pastry | Light dusting of flour + butter | Absorbs juices, keeps crust crisp |
| Torn edge | Patch with pastry offcut | Saves time and keeps seal |
| Bulging pasty | Use smaller pieces; don’t overfill | Even cooking and tidy edges |
Tip: chill assembled pasties briefly if the dough softens — cool dough crimps better and bakes crisper. Let them rest a few minutes after baking so the filling settles before you slice the top.
Make ahead, freeze and reheat
Ready to batch‑cook and save time without losing that just‑baked crunch? I help you plan so you can freeze and reheat with zero compromise on texture.
Freeze unbaked or baked: assemble and crimp as usual, cut the steam slit, then freeze the pasties on a tray so they don’t stick. Once solid, wrap each one individually and seal in a freezer bag. Label with the date and any filling notes.
Cook from frozen or reheat for a crisp crust
Bake straight from frozen — add 15–20 minutes to your usual minutes so the centre cooks through. No thawing needed. If you baked earlier, cool completely, wrap well and reheat uncovered in a hot oven at 190C/375F until piping hot.
- Tip: keep layers separated with parchment to protect the pastry and crimp.
- Portion the mixture ahead and chill it; fill and bake fresh for weekday ease.
- Avoid the microwave if you want a crisp crust — if used, finish in the oven for a few minutes.
- Don’t refreeze once thawed; bake what you need and keep the rest frozen.
| Stage | Action | Oven / Time | Why it helps |
|---|---|---|---|
| Unbaked | Tray‑freeze, then bag individually | Bake from frozen +15–20 minutes | Keeps shape and seals in juices |
| Baked | Cool completely, wrap tightly | Reheat uncovered 190C/375F until hot | Restores crisp crust and warm filling |
| Label | Mark date and variation | N/A | Helps plan and avoid guesswork |
| Portioning | Prep mixture ahead; chill | Bake fresh when needed | Gives best texture and aroma |
How to serve your Cornish pasties
Serve your pasties with easy, honest accompaniments that feel like a proper café plate. I like low-effort sides that lift the filling without stealing the show.

Classic sides: ketchup, salad, mushy peas or baked beans
Keep it simple: a generous dollop of ketchup is the classic partner. It brightens the savoury notes of the meat and pastry.
Fresh contrast: a crisp green salad with a sharp vinaigrette cuts through the richness of steak and vegetables. It makes the plate feel lighter.
- Lean into comfort with mushy peas or baked beans for a cosy pub‑style side.
- For picnics, wrap each pasty in greaseproof paper — they travel well and taste great warm or at room temperature.
- If you’ve made larger pasties, offer a small salad; for mini ones, pick heartier beans or pickles.
- Pair with a mug of tea or a light ale on cool evenings — simple and satisfying.
| Side | Why it works | Serve with |
|---|---|---|
| Ketchup | Brightens savoury filling | Hot pasty; dipping |
| Green salad | Provides freshness and acidity | Large pasty; sharp dressing |
| Mushy peas / baked beans | Comforting, warm and filling | Pub lunch style; cosy evenings |
| Pickles / chutney (small) | Adds tang without overpowering | Sharing plates; sliced pasty |
Conclusion
A little patience — the chill, the crimp, the rest — turns basic ingredients into a truly comforting bake.
You now have everything you need to make a proper cornish pasty: simple steps, honest ingredients and a few smart tips that make all the difference. Give yourself time to chill, roll and crimp — those extra minutes help the pastry set and brown better.
Rest baked pasties briefly before eating so the juices settle. Reheat in a hot oven to keep the crust crisp; add a few minutes if starting from frozen so the centre heats through.
Keep the filling classic and raw when you assemble for the most tender bite. That tidy side crimp is more than a finish — it’s your seal and handle for happy eating.
If you try this, tell me how it went — what you filled yours with, how your crimp looked and which sides you served. I read every comment on this post and love hearing from you about good food and small kitchen wins.