You want a reliable Gluten-Free Scone Recipe that actually rises and feels light — and you want it without faff. I share the simple tricks I use on the road: good self-raising flour, cold butter, a splash of lemon in milk, and a hot tray so the scones spring up tall and tender.
I bake with everyday pantry staples because time is precious. The result is a quick, warm treat for an easy afternoon tea — no stand mixer, no stress.
I’ll show how small tweaks (cut straight down with the cutter, preheat the tray, use fresh baking powder) make a big difference. With a few swaps you can also make these dairy-free or vegan, so everyone can tuck in.
Key Takeaways
- Use good self-raising flour and cold butter for taller, tender scones.
- Add lemon to milk for an instant buttermilk effect and softer crumb.
- Preheat the oven and baking tray to boost rise — quick results in minutes.
- Cut straight down with your cutter; don’t twist, to protect the rise.
- Simple pantry staples make this recipe easy to repeat on busy days.
A warm welcome and why these gluten-free scones work
From caravan kitchens to country tearooms, I learned a few tricks that turn tricky blends into proud, tender scones. Want the short version? Use a reliable self raising gluten free flour, keep the butter cold and handle the dough gently.
Why this method works: a good flour blend (I favour Doves Farm FREEE) often has leavening and binders built in, so you start with a consistent base. Fresh baking powder gives the extra lift scones need, and a small amount of xanthan gum acts like scaffolding for the crumb.
- Cold butter rubbed into flour creates flaky layers.
- Quick buttermilk (milk + lemon) softens the centre.
- Press the dough together — don’t knead — to keep rise and lightness.
| Ingredient | Role | Tip |
|---|---|---|
| Self raising flour | Base and initial lift | Use a trusted blend for consistency |
| Baking powder | Extra lift | Use fresh tins — lift is life |
| Xanthan gum | Binding without gluten | Small amount prevents crumbling |
| Butter | Flake and flavour | Keep cold and rub quickly |
Gluten-Free Scone Recipe
Ready for a straightforward list of ingredients that actually work every time? Below is a tested mix and quick swaps so you can bake for anyone — without guesswork.
Ingredients at a glance
- 340 g gluten free self raising flour (or 340 g plain + extra powder/gum)
- 85 g cold butter
- 4 tbsp caster sugar, 175 ml milk + 3 tsp lemon
- 1 egg for glazing, 1 tsp baking powder, 1/4 tsp xanthan gum
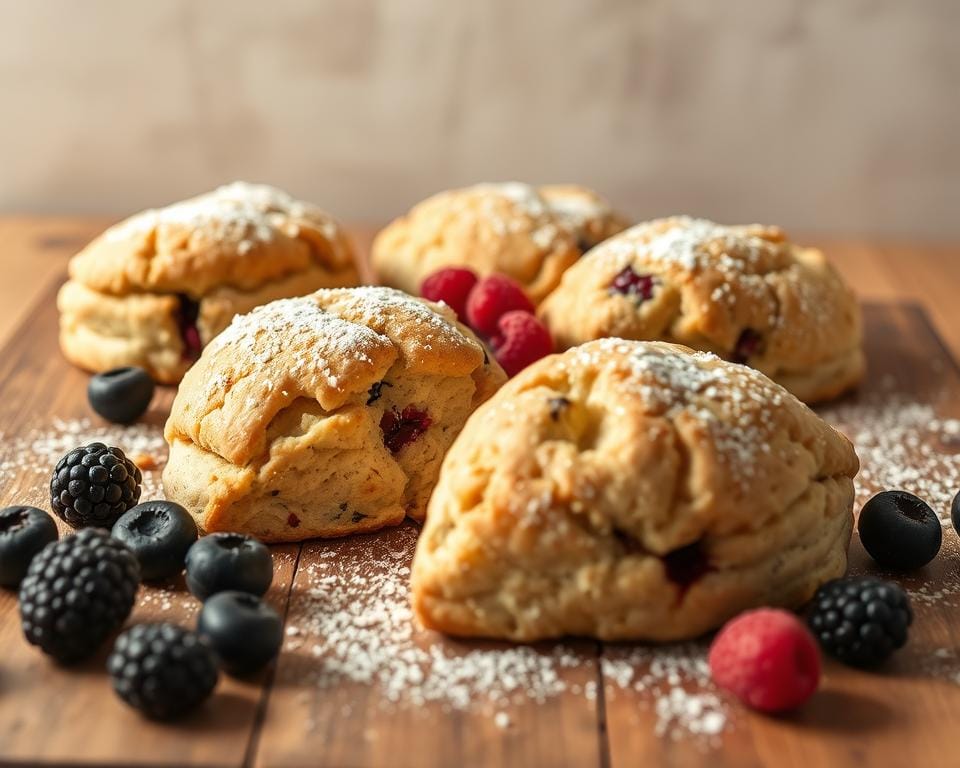
- Optional add-ins: sultanas, chopped chocolate or blueberries
Easy swaps and tips
If you can’t find a ready blend, use plain flour and add 2 tsp extra baking powder and 1/4 tsp extra gum. For dairy-free or vegan bakes, use a hard baking block and plant milk; brush tops with milk instead of egg.
| Need | Swap | Why |
|---|---|---|
| Self raising flour | Plain + powder | Control lift and texture |
| Butter | Plant baking block | Keeps flake and structure |
| Milk | Lactose-free | Low-FODMAP friendly |
Shopping tip: measure by weight and keep the butter cold — that’s the secret to tall, light scones every time.
Tools and prep: simple kit, no fancy mixers needed
You don’t need a trolley full of kit to get tall, tender scones — just a few trusty tools and a hot oven. I keep the list short and wallet-friendly so you can bake today with what’s already in your kitchen.

What to have ready
- One large bowl and a metal spoon — light strokes keep the mix airy.
- A 45–55 mm cutter or a floured glass if you don’t own one.
- A lined baking sheet with parchment paper and a hot tray for extra lift.
Set the oven rack to the middle and preheat oven to the right temperature with the tray inside. That first burst of heat helps set layers and gives a golden base.
| Tool | Why it matters | Tip |
|---|---|---|
| Bowl | Mixing without overworking | Use a large one so you can fold quickly |
| Cutter | Classic height and shape | 45–55 mm for afternoon-tea proportions |
| Baking sheet & parchment | Even browning and easy release | Lightly dust sheet with flour over the parchment |
Quick checklist: preheat oven and tray, parchment ready, cutter floured — now you’re ready to follow the recipe for reliable gluten free scones.
Step-by-step method for tall, tender scones
Follow these simple steps and you’ll have tall, tender scones coming out of the oven in minutes. I guide each stage so you feel calm and confident from preheat to plate.
Preheat and line
Preheat the oven to 220°C (200°C fan) / 425°F and slide a baking sheet in to heat. A hot tray gives an instant burst of steam under the dough and helps scones rise with a crisp base.
Rub in the butter
Whisk the flour with fresh baking powder and a pinch of xanthan gum. Rub cold or frozen grated butter into the flour until the mix looks sandy and holds soft crumbs. Stir in the sugar lightly so the mixture stays airy.
Bring the dough together
Make instant buttermilk by adding lemon to milk, then add vanilla if you like. Pour into the dry mix and bring the dough together with a spoon—no kneading. Tip the dough onto floured paper and fold over a few times.
Pat to 3.5–4.5 cm thick — this height is your insurance for tall scones.
Cut, glaze and bake
- Flour a 45–55 mm cutter and press straight down — never twist — to avoid sealing the sides.
- Gather trimmings gently and recut; handle as little as possible so layers stay intact.
- Place scones on the hot baking sheet with space between. Brush the tops scones with a beaten egg or milk.
- Bake for 12–15 minutes until the tops are golden and the base is deeply golden. If your oven runs cool, add a minute or two.
- Rest for two minutes on the sheet, then move to a rack — this keeps the crumb tender and the crust crisp.
| Step | Why it matters | Quick check |
|---|---|---|
| Preheat tray | Boosts initial rise | Tray very hot when you slide scones on |
| Cold grated butter | Creates flaky layers | Mix looks sandy |
| Cutter technique | Preserves rise | Press straight down, don’t twist |
Pro tips to help your scones rise and stay soft
Little tricks—like a short chill and a hot tray—make the difference between flat rounds and proud, tall scones. I share the why behind each tip so you learn the feel of the dough and can trust your instincts.
Fresh leavening and gentle handling
Check the baking powder date. Fresh powder is the first defence against flat bakes. Add it just before you rub in the butter so the lift is ready when the oven heat hits.
Rest, chill and a quick freeze
Rest the dough in the fridge for 20–30 minutes to let flour hydrate — this makes the crumb softer. If you want extra flaky layers, pop the tray in the freezer for 15 minutes so the butter firms up again.
- Handle the mixture as little as possible; pressing or twisting knocks out air.
- Place scones close — shoulders touching helps them climb in the first hot minutes.
- Use a pinch of xanthan gum only as directed; too much tightens texture.
| Tip | Why it works | Quick check |
|---|---|---|
| Hot oven & steady temperature | Sets layers fast and gives colour | Tray sizzling when you slide on the dough |
| Short chill / 15-minute freeze | Hydrates flour & firms butter | Dough feels cool and slightly firm |
| Minimal handling | Preserves air and flaky layers | Dough still slightly shaggy, not smooth |
Want a quick vegan bake idea while you wait? See this vegan shortbread guide for an easy twist on butter-forward treats.
Choosing the right gluten-free flour and binders
Confused by labels? I’ll walk you through which flour works best and why.
Pick a balanced flour blend — blends combine starches and wholegrain flours so the texture stays light, not sandy. A good self raising blend often already has leavening and sometimes gum, which saves a step and gives predictable rise.
If you use plain gluten-free flour, add about 2 tsp baking powder and 1/4 tsp extra xanthan gum per 340 g to mimic a self raising mix. Avoid single-flour swaps (coconut or buckwheat alone); they lack the structure a blend provides.
- Read the bag — some blends already contain gum; reduce any extra you add.
- Weigh flour rather than scoop for consistent results across brands.
- Keep notes on which blend you tried — small differences change hydration and handling.
| Type | When to use | Quick tip |
|---|---|---|
| Self raising blend | Everyday scones and quick bakes | Usually includes leavener and gum |
| Plain blend | When you want control | Add baking powder + xanthan gum |
| Single flours | Special diets only | Mix with starches for structure |
Tasty twists: lemonade scones, fruit-studded, or savoury
Short on time? A lemonade-and-cream method makes light, rich scones in one bowl. It skips rubbing-in and still gives a lovely lift.
Lemonade and double cream shortcut
Use 400 g gluten free self-raising flour, 40 g sugar, 1 tsp baking powder, 220 ml double cream and 220 ml fizzy lemonade.
Fold gently — do not overmix. Cut straight down, place the rounds close together and brush with milk. Bake at 200°C/400°F for about 15 minutes.
Mix-ins and toppings
Fold in sultanas, blueberries or dark chocolate just before shaping. For savoury, skip sugar and add 100 g grated cheddar plus black pepper.
Quick tips:
- Keep the mixture soft and a little sticky — that gives a cloud-soft crumb.
- Brush tops scones with milk and sprinkle sanding sugar or grated cheese.
- For dairy-free free scones, swap cream for thick plant cream and add a little extra flour if needed.
| Variation | Why it works | Quick tip |
|---|---|---|
| Lemonade & cream | Fizz lightens the dough; cream adds richness | Fold once, bake close together |
| Fruit-studded | Fruit adds sweetness and moisture | Add fruit last to avoid overworking |
| Cheese & chive | Savoury crumb, great for picnics | Grate cheese finely and press cutter straight down |
Serving suggestions for a British afternoon tea
Want to make an ordinary afternoon feel like a small celebration? I love the simple rituals that turn baking into memory. Warm the tray, lay out a pot of strong tea and let the table tell the story.
Jam, clotted cream and quick rewarm tips
Rewarm baked scones in a 180°C oven for about 5–10 minutes so the crust revives and the middle turns plush again. Rest briefly and serve at room temperature if you prefer gentler heat.
- Warm your scones in the oven for a few minutes — the difference is instant.
- Classic order? I spread jam first, then clotted cream — the sweet-tart fruit cuts through the rich cream beautifully.
- Make-ahead: bake in the morning, cool at room temperature, then reheat just before tea.
- For a lighter option, try crème fraîche with a drizzle of honey and a few berries.
- Label a plate clearly when you serve gluten free bakes for mixed company.
| Action | Timing | Note |
|---|---|---|
| Rewarm | 180°C for 5–10 minutes | Revives crust and softens centre |
| Make-ahead | Bake morning, cool | Reheat just before serving |
| Serve style | Immediate | Jam first, then cream — or cheese & chutney for savoury |
Storing, freezing, and reheating
A little planning means you can enjoy warm scones any day of the week — even from the freezer. Here I give clear steps to keep texture and flavour at their best.

Short-term and fridge storage
Cool baked scones completely before you do anything. Pop them into an airtight container to protect that tender crumb.
Keep at cool room temperature for 1–3 days. For longer, refrigerate up to 3–5 days and rewarm before serving.
Freezing tips
Freeze for 2–3 months. First, place scones on a baking sheet until firm — this stops them sticking together.
Wrap each scone individually, then place in a bag and press the air out. Label with the date so you know the best time to use them.
Reheat and bake-from-frozen
- Preheat the oven to 180°C.
- Reheat from frozen on a sheet or baking sheet for around 10 minutes, until the centre feels warm.
- Don’t microwave if you want a crisp crust — the oven does the job best.
- You can also freeze shaped dough and bake from frozen; add a minute or two to the bake time and watch the colour.
| Action | Time | Tip |
|---|---|---|
| Room storage | 1–3 days | Use an airtight container |
| Fridge | 3–5 days | Rewarm in oven before serving |
| Freezer | 2–3 months | Wrap individually and label with date |
If you batch-bake, keep a few plain and a few fruity ones. In a hurry? A single frozen scone and ten quiet minutes in the oven is my favourite coffee break.
Conclusion
There’s a simple set of cues that make tall, soft gluten free scones repeatable every time. Use a trusted flour blend, fresh leavening, cold butter and a hot tray for that bakery lift — the basics really do matter.
Stick with gentle handling, measure by weight and cut straight down. Small swaps and storage tips mean this recipe fits busy weeks and special weekends alike.
Pair a warm scone with yoghurt for extra protein, or keep them plain, fruity or savoury. I hope you feel ready to preheat, bake and share — the first batch is always the sweetest.
Thanks for baking along — now it’s your turn to try this scones recipe and make it your own.