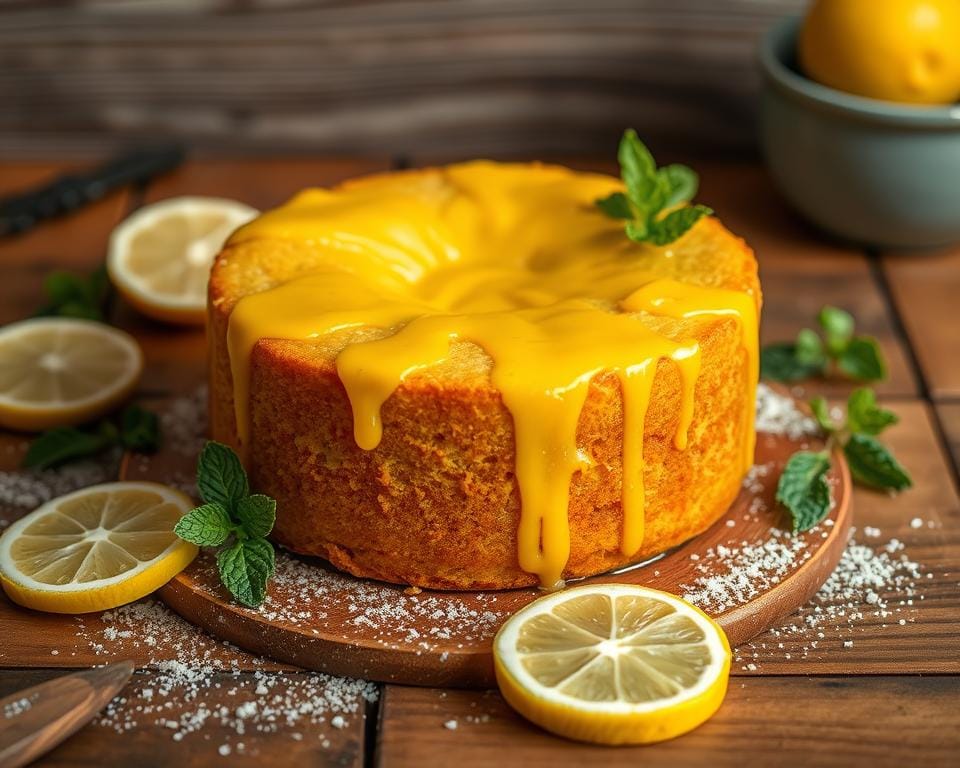
There’s something irresistibly comforting about a perfectly balanced citrus treat – sharp yet sweet, tender but sturdy. My favourite version? A classic British bake with a sunny twist. Whether you’re after a weekend project or a last-minute pudding, this crowd-pleaser delivers every time.
Inspired by decades of tea-time traditions and tweaked with wisdom from baking legends, this method skips fussy techniques. You’ll find no soggy bottoms here – just a moist crumb soaked in tangy syrup. I’ve road-tested it from Dorset kitchens to London flats, adapting measurements for reliability without sacrificing that signature zing.
Key Takeaways
- Simple method ideal for novice bakers and busy schedules
- Authentic British heritage with modern, foolproof adjustments
- Proven tips from trusted culinary sources for consistent results
- Balanced flavour profile combining sharp citrus and buttery sweetness
- Adaptable base recipe for experimenting with different citrus fruits
Gathering the Ingredients
Every great bake starts with quality components. Let’s unpack what you’ll need to create that signature citrus-kissed sponge and sticky syrup topping. Trust me – these choices make all the difference between ‘nice’ and ‘where’s the recipe?’ requests at your next gathering.
Cake Essentials
For the base, you’ll want unsalted butter – it lets you control the salt content perfectly. I always reach for golden caster sugar rather than white; its caramel notes complement citrus beautifully. Large free-range eggs add richness, while self-raising flour gives that essential lift without extra baking powder.
My top tip? Use unwaxed lemons. Their zest packs more flavour, and you avoid any weird coating residues. Measure everything precisely – baking’s a science, but we’ll keep it stress-free!
Drizzle Components
The syrup’s simplicity is genius: just fresh lemon juice and more caster sugar. The heat from the warm cake helps this mixture seep into every pore. I’ve found slightly coarse sugar here creates a delightful crackle on the surface.
If you’re involving little helpers, this is their moment to shine. Measuring lemons for zesting (always zest before juicing!) and mixing the drizzle teaches kitchen basics without any sharp tools. Just keep towels handy – sticky fingers are practically guaranteed.
Essential Equipment and Preparation
Great bakes aren’t just about ingredients – your tools matter more than you think. Getting the oven and tin ready might seem tedious, but trust me, skipping these steps leads to more kitchen dramas than a soggy bottom. Let’s sort your setup so you can bake with confidence.
Oven Settings and Preheating
First things first: preheat your oven. I stick to 160℃ fan (180℃ conventional) for even baking. Cold ovens cause uneven rises – nobody wants a lopsided sponge! Use an oven thermometer if yours runs hot or cold. Those dials can lie.
Here’s a pro move: keep the oven door shut during baking. Peeking lets heat escape, slowing the rise. If you’re using a one bowl method (yes, minimal washing up!), mix your batter just before the oven dings ‘ready’. Quick transitions prevent soggy batter.
Greasing and Lining Your Tin
A well-prepped tin is your insurance policy against stuck cakes. I use softened butter and a pastry brush for corners. Baking paper? Non-negotiable. Cut a circle for the base and strips for the sides – no fancy shop-bought liners needed.
If you’re using a loose-bottom tin, double-check the seal. I’ve had more than one syrup leak onto the oven floor! For the one bowl enthusiasts: wipe your bowl clean between mixing stages. Leftover flour lumps? Not on my watch.
Easy Lemon Drizzle Cake Recipe: Step-by-Step Instructions
Creating the perfect citrus-infused sponge is simpler than you might think. Let’s walk through each stage with confidence – I’ve streamlined this process over countless bakes to eliminate guesswork. You’ll be amazed how a single bowl and careful timing transform basic components into something extraordinary.

Mixing the Batter
Start by beating softened butter and caster sugar until pale – this traps air for lift. Crack in eggs one at a time, mixing thoroughly after each. I sift self-raising flour directly into the bowl, adding finely grated zest for that fragrant punch. Fold gently with a metal spoon to keep things light.
Make sure no flour pockets remain, but don’t overdo it – a few seconds’ extra mixing makes all the difference. The ideal consistency? Like thick clotted cream sliding off your spoon. If it looks curdled, add a spoonful of flour to bring it back.
Baking to Perfection
Pour your silky batter into the prepared tin, smoothing the top with a spatula. Bake in the centre rack for even heat distribution. Set a timer for 35 minutes, but start checking at 30 – ovens vary wildly. The skewer test never lies: insert it diagonally and look for clean crumbs, not wet batter.
Make sure to rotate your tin halfway if your oven has hot spots. A golden crown with slightly pulled edges signals readiness. Let it cool briefly before pricking holes for the syrup – patience here prevents crumbly disasters.
Achieving the Perfect Drizzle
The magic happens when syrup meets sponge. Timing and technique here make the difference between a merely good bake and one that’ll have friends begging for your secret. Let’s nail that sticky, tangy finish everyone craves.
Creating the Citrus Syrup
Start by whisking icing sugar with freshly squeezed lemon juice – aim for a ratio of 2:1. I prefer slightly warmed juice as it dissolves the sugar faster. Heat the mix gently for 60 seconds, stirring until it resembles runny honey. This brief simmer intensifies flavour without losing brightness.
While the cake’s still warm (about 10 minutes out of the oven), poke deep holes across the surface with a skewer. Pour your syrup slowly, letting it trickle into every crevice. Work in stages – too much at once causes pooling. Wait 5 minutes between layers for proper absorption.
Patience pays: let the bake cool completely before slicing. This gives the drizzle topping time to set into that signature crackle. If syrup slides off, your sponge wasn’t warm enough. Next time, check it’s still radiating heat when you start pouring.
Adding a Zesty Touch with Personal Tips
Mastering the balance between sweet and tangy transforms a good bake into something unforgettable. Over years of testing, I’ve found that quality ingredients and measured tweaks create that signature harmony. Let’s explore how to fine-tune your bake for maximum impact.
Balancing Flavours and Texture
To amplify citrus zing without overpowering sweetness, use twice as much zest as juice. The oils in the peel carry intense flavour without acidity. If your mixture tastes sharp, add a teaspoon of sugar gradually – taste as you go. Freshly squeezed juice matters here; bottled versions lack brightness.
That crackly syrup layer? It’s all about timing. Pour while the sponge’s warm, but not hot. Let each drizzle sink in before adding more. This builds texture contrast – moist crumb beneath a crisp sugar crust. For extra crunch, sprinkle demerara over the syrup before it sets.
Don’t hesitate to adjust ratios. Prefer tartness? Reduce sugar in the syrup by 10%. Want mellower notes? Swap half the lemon juice for orange. These small shifts let you make lemon work for your palate. Just keep notes – your perfect balance might surprise you.
Remember: superior ingredients elevate everything. Organic unwaxed citrus and unrefined sugars deliver cleaner flavours. Your bake will thank you.
Troubleshooting Common Issues
Even seasoned bakers face hiccups now and then. Don’t fret – most problems have straightforward fixes. Let’s tackle two frequent challenges and restore your confidence in creating that light, citrusy loaf.
Why Does My Sponge Collapse?
A sunken centre often stems from oven temperature fluctuations. Opening the door too early? That rush of cold air deflates delicate bubbles. Stick to the timer and use the light instead. Check your loaf tin size too – overfilled tins rise unevenly before collapsing.
Another culprit? Excess raising agent. Self-raising flour already contains it, so adding baking powder creates instability. Measure precisely and sift thoroughly. If your skewer test shows wet crumbs but the top’s golden, cover with foil and bake 5 more minutes.
Mastering the Mix
Overworking batter squeezes out air, leading to dense results. Fold dry ingredients gently until just combined – a few lumps are fine. Use a spatula instead of electric beaters for this stage. If you spot flour streaks, stop immediately.
| Issue | Likely Cause | Quick Fix |
|---|---|---|
| Sinking middle | Premature oven opening | Use window light, set timer alerts |
| Dense texture | Over-mixed batter | Fold with spatula in 8-10 strokes |
| Sticky crumbs | Underbaked centre | Test multiple spots with skewer |
Remember: Baking time varies by tin material. Dark metal conducts heat faster than glass. Reduce temperature by 10℃ if using darker tins. Track results in a notebook – your future self will thank you!
Enhancing the Flavour with Creative Twists
Baking becomes an adventure when you play with flavours and forms. Why stick to tradition when your mixture can morph into something new? My favourite hack? Turning this classic into bite-sized delights. Swap the loaf tin for cupcake cases – suddenly, you’ve got portable sunshine perfect for lunchboxes or bake sales.
For lemon cupcakes, adjust your baking time to 18-22 minutes. The same batter works beautifully – just fill cases two-thirds full. Once cooled, pierce each with a cocktail stick before drizzling. This way, the syrup soaks right into the centre. Top with candied zest or edible flowers for Instagram-worthy results.
Experiment with your mixture too. Replace half the caster sugar with light brown for caramel undertones. Fancy a citrus medley? Add orange or lime zest alongside the lemon. I’ve even stirred poppy seeds into the batter for crunch – just remember they’ll absorb liquid, so add an extra spoonful of juice.
The way you apply the syrup changes everything. Try a piping bag for precise zigzags, or brush it on for a glossy finish. Kids adore sprinkling freeze-dried raspberry dust over warm cupcakes – it creates a sweet-tart crust as it sets.
Don’t overlook presentation. A mixture of granulated and icing sugars in the drizzle gives texture contrast. For gatherings, serve mini lemon cupcakes on a tiered stand with herb garnishes. Mint or thyme leaves add fresh aromas that elevate each bite.
Remember, baking’s meant to spark joy. Whether tweaking the caster ratio or inventing new ways to decorate, these twists make the process yours. Share your creations – I’d love to see what delicious deviations you dream up!
Serving Suggestions and Storage Ideas
The real joy of baking comes when you share your creation. Whether hosting friends or treating yourself, thoughtful presentation and smart storage keep every slice tasting fresh. Let’s explore how to make the most of your bake from first slice to final crumb.
Enjoying with a Hot Cup of Tea
Pairing this citrus treat with a proper brew elevates both. I favour Earl Grey – its bergamot notes harmonise beautifully with zesty flavours. Serve slightly warm slices on vintage plates for a cosy afternoon vibe.
Use a serrated knife for clean cuts. Wipe the blade between slices to prevent sticking. For gatherings, pre-cut portions into two-bite sizes – they’re less messy and perfect for nibbling.
Best Ways to Store Leftovers
Wrap cooled leftovers in baking paper before placing in an airtight container. This prevents the syrup from making the crust soggy. At room temperature, it stays fresh for three days – if it lasts that long!
Freezing? Absolutely. Slice into portions first, wrapping each in cling film. Pop them in a freezer bag labelled with the date. Thaw overnight on the counter when cravings strike.
| Storage Method | Duration | Tip |
|---|---|---|
| Airtight container | 3 days | Layer with baking paper |
| Freezer | 1 month | Pre-slice for easy thawing |
| Bread bin | 2 days | Use waxed paper liner |
Adjust your tin’s size to control portion amounts. A 2lb loaf yields 10 generous slices, while mini tins create individual treats. Remember: smaller bakes cool faster, speeding up syrup absorption.
Kids in the Kitchen: Making Baking Fun
Baking becomes pure magic when tiny hands join the adventure. This recipe lemon drizzle shines as a gateway to kitchen confidence, letting young chefs contribute meaningfully without complex steps. With minimal equipment and maximum smiles, it’s the ideal project for rainy afternoons or weekend bonding.

Simple Tasks for Little Helpers
The one-bowl method keeps chaos at bay. Let them measure flour with guided scoops – perfect for practising numbers. Cracking eggs? Hold their hands initially, then watch their pride as yolks land cleanly. Mixing batter becomes a gigglesome game when you chant “fold, don’t stir!” together.
Syrup duty’s their crowning moment. Small fingers excel at poking holes for the sugar lemon juice mixture. Provide a teaspoon for controlled pouring – spills become sweet memories rather than disasters. They’ll beam seeing their drizzle transform the golden sponge.
Safety first: assign tasks by age. Under-fives can zest (supervised) or count eggs. Older kids level flour with a knife and operate timers. Celebrate every contribution, even if flour dusts their eyebrows. These shared moments make lemon drizzle creations taste twice as good.
Remember, mess means engagement. Lay down newspaper for quick clean-ups. Capture their beaming face presenting the finished drizzle cake – it’ll become a cherished kitchen snapshot. Who knows? You might spark a lifelong love for baking.
Conclusion
Whisking up this citrus delight truly proves how simple ingredients create magic. From mixing that buttery batter to watching the syrup soak in, each step builds towards a golden moment. The beauty lies in its adaptability – swap citrus, tweak sweetness, or play with presentation. It’s a bake that welcomes creativity while staying reliably delicious.
Whether you’re new to baking or a seasoned pro, this treat bridges generations. I’ve shared it at village fetes and city suppers, always met with empty plates. The secret? Balancing sharp zest with sugary crunch – a harmony that never fails to charm.
Thank you for joining me in this kitchen adventure! I’d love to hear how yours turns out. Tag your creations online or drop a comment below – every baker’s twist adds to the story. After all, good food’s meant to be shared, and there’s always room for another slice.
Now, put the kettle on and grab your whisk. Your next great bake awaits – let’s make those taste buds sing!