Ever fancied baking a loaf that tastes like a cosy kitchen in County Cork? This crusty, soda bread recipe brings heritage to your table with just four basic ingredients. It’s the kind of no-fuss bake that’s survived generations – no yeast, no waiting, just warm, wholesome goodness in under an hour.
I’ve tweaked my version using unbleached flour and cultured buttermilk for that perfect tang. The magic lies in baking soda, which reacts with the acidity to create a tender crumb. Whether slathered with butter or paired with soup, this loaf feels like a hug from your granny’s recipe book.
Key Takeaways
- Uses pantry staples like flour, buttermilk, and bicarbonate of soda
- Requires no proving time thanks to chemical leavening
- Develops a crisp crust when baked in a cast-iron pot
- Pairs perfectly with soups, cheeses, or salted butter
- Rooted in 19th-century European baking traditions
The Charm of Irish Soda Bread
What if your next bake could blend history with today’s hustle? This crusty loaf bridges centuries-old customs with modern convenience. You’ll find it’s as much about storytelling as it is about sustenance.
A Quick Bread for Modern Homes
Busy schedules meet their match here. My go-to bread recipe skips yeast and proving time – just mix, shape, bake. A baking sheet is all you need for that signature rustic base.
Tip the dough onto your worktop with confidence. It’s meant to be handled briefly, not kneaded into submission. Within 40 minutes, you’re slicing into warmth that makes takeaway seem dull.
Rich Traditions in Every Slice
Every crumb whispers of farmhouse kitchens and shared wisdom. Many families treasure their version of this bread recipe, often baked for Patrick’s Day gatherings. It’s edible heritage that connects generations.
I love how a simple baking sheet transforms basic ingredients into something ceremonial. That cross you score? More than decoration – it’s a nod to hearth cooks who believed it blessed the meal.
Next time you’re shaping dough onto your counter, remember you’re part of a delicious continuum. Perfect for Patrick’s Day feasts or Tuesday soups, this loaf turns meals into moments.
History and Heritage of Irish Soda Bread
Ever wondered how a humble kitchen staple became a cultural icon? The story begins in the 1830s, when baking soda arrived in Europe. This unassuming powder changed everything – suddenly, families could make bread without yeast or hours of waiting.
From Hearth to Heartland
Early versions appeared in publications like The Virginia Housewife, showing how settlers adapted recipes to new lands. What started as a practical solution – using soda to leaven flour quickly – became a cherished tradition. My great-grandmother’s notebook reveals tweaks like adding oats during lean times.
By the 1900s, this method symbolised resourcefulness. Wartime shortages made its simplicity vital. Families passed down their versions, each generation adding whispers of personality while keeping the core intact.
| Period | Key Ingredient | Cultural Role |
|---|---|---|
| 1830s | Bicarbonate of soda | Rural necessity |
| Early 1900s | Wholemeal flour | Symbol of resilience |
| Modern day | Cultured buttermilk | Nostalgic comfort |
Today’s bakers honour that legacy. When I score my loaf’s cross, I’m echoing countless hands before mine. It’s not just baking – it’s keeping stories alive, one golden crust at a time.
Essential Ingredients for Traditional Irish Soda Bread
What transforms four simple pantry items into a crusty masterpiece? Let’s break down each component’s role in creating that signature texture. My years of testing prove even minor tweaks here make or break your results.

Cultured buttermilk is the magic maker. Its acidity activates the bicarbonate of soda, creating those essential air pockets. I’ve found full-fat versions yield a richer crumb compared to reduced-fat alternatives.
Unbleached plain flour gives structure without toughness. Bleached varieties can produce a gummy texture – trust me, I’ve salvaged enough failed batches to know. For extra nuttiness, some bakers swap 25% with wholemeal.
| Ingredient | Role | Pro Tip |
|---|---|---|
| Bicarbonate of soda | Leavening agent | Check expiry dates – old stock won’t rise properly |
| Fine sea salt | Flavour enhancer | Mix with dry ingredients to avoid uneven distribution |
| Egg (optional) | Richness boost | Adds golden colour; reduce buttermilk by 30ml if using |
Timing matters most during mixing. Once wet meets dry, you’ve got about 90 seconds to bring the dough together before the chemical reaction peaks. Overwork it, and you’ll end up with something resembling a doorstep wedge.
My top tip? Measure everything before starting. This isn’t the time to realise your baking soda’s gone flat mid-recipe. Digital scales beat cup measures for precision – a 10g flour difference changes everything.
Preparing the Perfect Dough
Mastering the dough is where the real magic happens. Get this right, and you’ll be rewarded with a loaf that’s crusty outside, tender inside. Let’s break down the process into foolproof steps.
Mixing Flour, Buttermilk and Baking Soda
Start by whisking 450g plain flour with 1 tsp salt and 1 tsp bicarbonate of soda. Use your fingertips to crush any soda lumps – they’ll leave bitter spots otherwise. Make a well in the centre and pour in 350ml buttermilk.
Mix with a fork until it resembles lumpy porridge. If adding an egg for richness, reduce buttermilk by 2 tablespoons. The dough should look shaggy, not smooth. Overmixing here leads to dense results.
| Ingredient | Purpose | Tip |
|---|---|---|
| Buttermilk | Activates leavening | Shake carton well before measuring |
| Salt | Balances flavours | Use flaky sea salt for better distribution |
| Egg (optional) | Adds moisture | Brush leftover egg on crust before baking |
Kneading and Forming a Rustic Loaf
Turn the dough onto a floured surface. Fold it over itself 4-5 times – think gentle pats, not proper kneading. Shape into a round about 4cm thick. The cracks and creases give character.
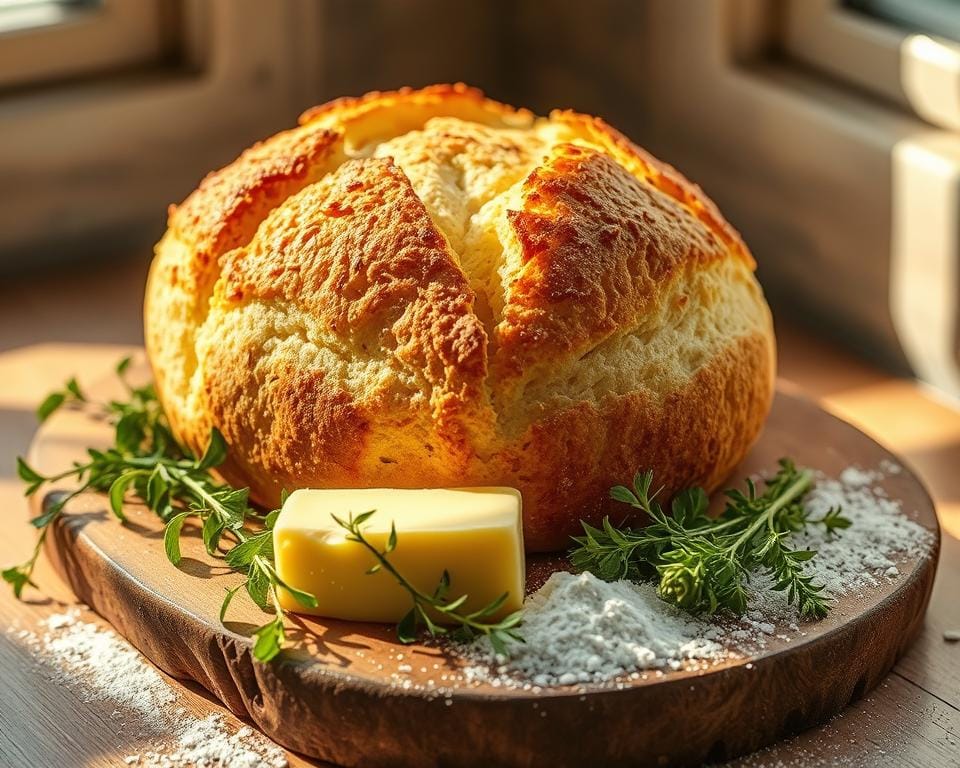
Melt 15g butter and brush over the top for golden colour. Use a sharp knife to score a deep cross – this helps heat penetrate evenly. Transfer to a preheated oven tray while still cold; the thermal shock boosts oven spring.
| Dough Check | Visual Cue | Action |
|---|---|---|
| Too sticky | Clings to fingers | Dust with 1 tbsp flour |
| Too dry | Cracks form | Sprinkle 1 tsp water |
| Perfect | Holds shape | Proceed immediately |
Baking Your Irish Soda Bread to Perfection
The final stretch transforms your dough into a crusty masterpiece. Nail these two steps, and you’ll unlock that signature texture – shatteringly crisp outside, cloud-soft within. It’s all about heat management and smart prep.
Oven Settings and Preheating Tips
Your oven’s first job? Become a sauna. I preheat to 220°C – any cooler, and the crust won’t caramelise properly. Cast iron pots work wonders, but a heavy baking sheet lined with parchment does the trick too.
Timing’s crucial here. Let the oven hit temperature 20 minutes before baking. That thermal mass gives instant lift when dough hits heat. Unlike yeast breads needing gradual rises, this method demands aggressive heat from the start.
Scoring the Dough for a Crisp Crust
That cross isn’t just pretty – it’s functional. Use a serrated knife to cut 2cm deep. This lets steam escape evenly, preventing wonky splits. Angle your cuts outward like opening a jacket – it helps the loaf expand without tearing.
Bake time? 30-35 minutes. Tap the base – it should sound hollow. Cool on a wire rack for 10 minutes. Resist slicing straight away; that time lets the crumb set properly.
| Issue | Fix |
|---|---|
| Pale crust | Brush with buttermilk pre-bake |
| Dense centre | Check soda freshness |
| Burnt base | Use doubled-up sheets |
Remember, this isn’t yeast territory – no second proving needed. But precision still matters. Get these elements right, and you’ll have a loaf that’s equal parts heritage and home-baked triumph.
The Role of Buttermilk and Baking Soda
Why does this loaf rise without yeast? The secret’s in the buttermilk and baking soda tango. When acidic buttermilk meets alkaline soda, they fizz like fireworks – creating bubbles that lift your dough. I once used expired soda and ended up with a doorstop. Lesson learned: freshness matters.

Measurements make or break the crust. Too much soda leaves a bitter aftertaste; too little means a flat top. My golden ratio: 1 tsp soda per 350ml buttermilk. Pouring the right cups of buttermilk (about 1½) ensures the dough stays tacky but not soggy – crucial for that crackly exterior.
Here’s the science bit no one tells you: the reaction peaks in 90 seconds. Mix fast, then stop. Overworking collapses those precious air pockets. I always dust my surface with flour first – sticky dough on bare counters is a nightmare.
| Ingredient | Role | My Pro Tip |
|---|---|---|
| Buttermilk | Activates leavening | Shake well – lumps ruin consistency |
| Baking Soda | Creates rise | Store in airtight jar |
| Flour | Structure | Weigh, don’t scoop |
Clean hands are non-negotiable. I shape the dough in 30 seconds flat – any longer and warmth melts the butter flecks needed for flakiness. That first crack of the crust? Pure serotonin. Nail this chemistry, and you’ll never buy supermarket loaves again.
Personalising Your Quick Bread
Ready to make this recipe your own? The beauty lies in its adaptability – a blank canvas waiting for your creative touch. Let’s explore how simple tweaks can elevate your bake from everyday staple to signature showstopper.
Additions for Extra Flavour
I’ve found that 85g of mix-ins strikes the perfect balance. Try folding in plump currants with orange zest for a citrusy twist, or sharp cheddar and cracked black pepper for savoury fans. Caraway seeds add an earthy note that pairs beautifully with soups.
Even a single ingredient swap changes the game. Swap half the plain flour for spelt to introduce nuttiness, or use honey instead of sugar for a delicate sweetness. Just keep the overall texture in check – too many wet additions require adjusting buttermilk quantities.
Online baking forums swear by lining your tray with baking paper when using sticky additions like dried cranberries. A sharp knife ensures clean cuts through chunky ingredients without tearing the dough. I keep my blade dusted with flour to prevent dragging.
Why not match your mix-ins to the day? Rosemary and sea salt for Sunday roasts, or dark chocolate chunks for weekend treats. The mild base welcomes both sweet and savoury partners – just ensure additions are dry to maintain the crumb’s integrity.
My golden rule? Jot down successful combos on greaseproof paper during experiments. Last Tuesday’s batch with sun-dried tomatoes and basil became an instant household favourite. That’s the joy – every bake becomes a new discovery.
Serving Suggestions and Pairings
Want to turn your fresh bake into a showstopper? Timing is everything. Slice while warm to preserve that irresistible contrast – crackling golden brown crust giving way to pillowy insides. I always serve mine straight from the oven, wrapped in a tea towel for that just-baked charm.
Warm with Butter, Cheeses or Jam
My go-to move? A smear of salted butter that melts into the crumb. For brunch, try honey butter swirled with orange zest – it’s like sunshine on a plate. Cheese lovers should grab a sharp cheddar or creamy Cashel Blue. The loaf’s mild tang balances bold flavours beautifully.
Last Sunday, I laid out a large bowl of toppings for guests. Think fig jam, spiced apple butter, and whipped goat’s cheese. The beauty of this quick bread? It plays nicely with sweet and savoury partners. Even my nephew devoured three slices slathered in blackcurrant preserve.
For picnics, I line a basket with parchment paper and layer thick wedges. The paper keeps moisture in without softening the crust. Pro tip: pack spreads separately in small jars – they’ll stay fresh while the bread travels.
Whether you’re pairing with morning coffee or evening soup, this soda bread recipe adapts effortlessly. That first bite of warm crumb with melting butter? Pure bliss. Just don’t blame me when your guests ask for seconds.
Storing and Reheating Your Soda Bread
How do you keep that just-baked magic alive for days? Let’s talk shelf life. First, set aside your loaf on a clean work surface for at least an hour. Rushing this step traps steam, turning your crust soggy. I use a wire rack – it lets air circulate underneath.
Once cool, wrap tightly in baking parchment. For longer storage, dust the paper with all-purpose flour to absorb moisture. Room temperature keeps it fresh for 2-3 days. Need more time? Freeze whole or sliced – just double-wrap in foil first.
Reviving day-old bread’s simple. Sprinkle lightly with water and bake at 180°C for 8 minutes. The steam reactivates the crumb without drying it out. For single slices, toast them straight from frozen – no need to thaw.
If you make well in advance, freeze dough balls for fresh bakes anytime. Thaw on a floured work surface, then bake as normal. Just remember: all-purpose flour works better than self-raising here – it prevents unexpected rising.
Last tip? Never refrigerate. The chill dries out the crumb faster. Instead, set aside a portion to make well-loved breadcrumbs for coatings or toppings. Waste not, want not – even staleness has its uses.
Conclusion
There’s something magical about pulling a golden-crusted loaf from your oven, knowing it’s steeped in centuries of kitchen wisdom. This recipe proves that heritage baking doesn’t need fussy techniques – just good milk, a steady hand, and that trusty sharp knife for scoring. My favourite part? Watching friends’ faces light up when they tear into the warm crumb.
If you’re new to no-yeast bakes, start here. The milk’s acidity works wonders with bicarbonate of soda, creating lift without waiting. I’ve linked my go-to affiliate links for tools – a proper sharp knife makes all the difference in achieving that signature cross.
Let your creation bread cool slightly before slicing – patience rewards you with perfect texture. Spread thick with butter or dunk into stews, and tag me in your photos! Nothing beats seeing your versions, whether you’ve stuck to the basics or added raisins (controversial, but delicious).
Remember: great bakes come from heart as much as skill. Every time I bake this, I’m reminded how simple ingredients like milk and flour can become something extraordinary. Now, who’s ready to preheat their oven?