I use a handful of practical Solo Travel Safety Tips that keep me calm and in control when I head out alone. These are small daily choices — planning arrivals in daylight, blending in, and keeping valuables out of sight — rather than rules that ruin the fun.
I share what I actually do to avoid common problems: opportunistic theft, dodgy places to stay, and getting stranded. I lean on situational awareness, local context, and delaying live-location posts so I’m not advertising where I am.
My aim is not to frighten anyone. It’s to give calm, usable habits for UK travellers using phones and apps wisely. Ahead I cover street habits, pre-trip research, accommodation checks, transport, money security, privacy online and staying safe outdoors.
Key Takeaways
- Safety is a set of small daily choices, not a mood.
- Plan daytime arrivals and research accommodation before you book.
- Keep valuables hidden and share live locations selectively.
- Use apps with care — they can help or expose you.
- Combine common sense with local context for smarter decisions.
Solo Travel Safety Tips I actually use (the habits that prevent most problems)
My practical routines make moving around alone feel normal and low-risk. I use clear, repeatable moves so I don’t have to think hard when I’m out.
Staying aware without looking nervous
I keep my head up and scan calmly. I only check my phone when I’m against a wall or inside a shop so nobody can creep up behind me.
Blending in
I dress like locals and keep jewellery simple. I avoid anything that shouts “tourist with cash” so I draw less attention from people who watch for easy targets.
Valuables and night rules
Nothing in back pockets. My bag sits across my body and my phone stays hidden unless I’m using it.
At night I favour reputable ride‑shares, well‑lit streets and I skip shortcuts. If someone gives me a bad feeling, I leave early—no arguing with myself.
- No headphones in busy or unfamiliar areas so I hear what’s around me.
- Step inside to check maps or put my back to a wall while I look.
- Polite exit is my rule: safety over manners.
| Situation | What I do | Why it works |
|---|---|---|
| Checking a map | Step into a café or stand with back to wall | Reduces chance of being approached from behind |
| Carrying valuables | Cross‑body bag, slim wallet, phone hidden | Less visible, harder to grab in crowds |
| Late at night | Use reputable rides, stick to lit routes | Lower risk and quicker help if needed |
Research and planning that makes me safer before I even leave home
A little research at my desk saves time and stress once I arrive in a new country. I check official government advisories and note any local rules that affect where I go and when.
Check local emergency numbers — they are not always 999 or 911. I find the nearest hospital, the local police number and the embassy contact for the country I’m visiting.
Choosing where to stay and the first journey
I pick areas I can walk to and from in daylight. I avoid neighbourhoods locals flag as risky and favour places with good reviews and clear access to transport.
My “first journey” is planned before I land. I set a main route and a backup if my phone dies or I lose data. That might be a printed map or a taxi number from the official desk.
Simple check-ins and copies of documents
I share my itinerary with a couple of friends and set a predictable check‑in schedule. It’s short and regular so someone notices if I go quiet.
I keep scanned and printed copies of my passport, bookings and travel insurance. Originals stay separate from the copies so one loss doesn’t spoil the whole trip.
- Advisory sources: government websites and the embassy page.
- Emergency: local numbers, nearest hospital, embassy contact.
- Documents: scanned files online + one printed set in luggage.
| What to check | Where to find it | Why it matters |
|---|---|---|
| Official advisories | Government travel pages | Shows risks and local rules |
| Emergency numbers | Embassy site / local health site | Quick help when needed |
| Passport & insurance copies | Cloud storage + printed copy | Recovery if originals are lost |
Accommodation safety: hotels, hostels, and Airbnbs
A calm night often comes down to small checks I can do in five minutes after I walk into a room. I look for clear signals in reviews: repeated mention of staff presence, reliable locks, good lighting and comments from solo guests who felt comfortable. These clues show a hotel or rental takes security seriously.
Picking a room and quick checks on arrival
I usually ask for a room on the second floor — high enough to deter street access, low enough for a sensible escape route. Immediately I test the door lock, check window fastenings and note whether corridors are well lit.
Small, low-effort privacy tweaks
Simple moves make a difference. I cover the peephole, tuck a towel under the door to reduce drafts and make the room feel more private, and close curtains before settling in.
Essentials I keep by the bed
Every night I place my phone, a bank card, a small amount of cash and my key essentials in the same spot beside the bed. That way I can leave quickly without hunting through cases or luggage.
Spotting red flags and handling luggage
I do a quick scan for obvious camera placements — routers, mirrors, soft furnishings and clock radios get a glance. If anything feels off, I move to another place or speak to reception.
- Never hand over my passport as a deposit — if a host insists, I walk away.
- Lock what I can and keep valuables on me rather than leaving them “behind reception”.
- Check insurance details before booking so belongings are covered if something goes wrong.
| What I check | Why it matters | Quick action |
|---|---|---|
| Consistent review comments | Shows ongoing staff and security standards | Prefer places with multiple recent, similar notes |
| Room locks & lighting | Reduces chance of unauthorised access | Test locks, use corridor lights, change room if needed |
| Visible camera scan | Protects privacy | Scan obvious spots; report concerns immediately |
Street smarts when I’m exploring a new place
Exploring a new place feels better when I act like I belong, even if I don’t know every street. I use small habits that keep me calm and make me look purposeful.

How I avoid looking lost (without missing the fun)
I pre-check the route on maps before I step out. Then I walk with a steady pace and purpose. When I need to check directions, I step into a doorway, café or quiet bay so I’m off the pavement.
Distraction tricks I watch for in busy areas
Markets, stations and sights are where people use distraction setups. One person will chat or hand over a “free” item while another targets bags or pockets.
- Rule: don’t hold a phone out while chatting with strangers.
- Watch for sudden crowds or someone trying to close the distance.
- Keep valuables in an inner pocket or cross‑body bag.
What I say when someone asks if I’m travelling solo
I stay vague and polite. I usually reply, “I’m meeting a friend later,” or simply, “I’m fine, thanks.” It keeps the chat friendly but stops people from probing for times or plans.
| Situation | My immediate action | Why it works |
|---|---|---|
| Checking a map | Step aside into a shop or doorway | Reduces chances of being approached from behind |
| Someone offers a “free” item | Politely decline and move on | Keeps distance and protects belongings |
| Asked if I’m alone | Deflect with a vague line | Maintains privacy without rudeness |
Staying safe while waiting for public transport
Waiting for a bus or train feels safer when I stand where I can see the whole platform and other regular commuters. I pick a well-lit, obvious place near exits or ticket machines. That way I have clear sightlines and can leave quickly if needed.
Where I stand, what I keep in my hands, and what stays in my bag
I stand with my back to a wall or pillar so nobody can approach from behind. I stay near other people rather than in an isolated corner.
I avoid holding a phone on show. My hands are empty or hold a ticket; valuables stay zipped inside my bag. This reduces attention and lowers the chance of bumping or theft.
Why I avoid quiet stops at night (and what I do instead)
At night I skip dim stops. I’ll reroute, take a reputable taxi, or wait somewhere busier. If a stop feels wrong, I trust that feeling and change plans.
When I ask locals for a safer route or station
I ask hotel staff, hosts or shopkeepers which station is best after dark. Locals often know which place is busy and which is best avoided at certain time.
- Buddy approach: if a small group is heading the same way, I join them for extra reassurance.
- If you see something, say something: in big-city stations I report unattended bags or odd behaviour to staff or use the emergency contact point.
| Action | Why it helps | Quick tip |
|---|---|---|
| Stand in sight near other people | Reduces chance of being isolated | Choose well-lit areas by exits |
| Keep phone hidden, bag zipped | Less temptation for thieves | Hold ticket only in hand |
| Ask locals or staff | They know the safe route at night | Use front desk recommendations |
For practical planning ideas, see my short guide to first‑time planning before you head out.
Ride-sharing safety (Uber, Bolt, and app-based lifts)
Before I step into any app‑booked vehicle I verify a couple of clear details. This takes thirty seconds and avoids awkward or risky moments at the kerb.
Checks I run before I get in
I match the number plate and the driver name shown in the app. If either item is wrong, I don’t get in.
I ask a simple question: “Who are you here for?” A correct reply proves the driver is on the right job and helps me avoid people who simply agree to anything.
Where I sit and what I share
I sit in the back seat for space and an easy exit. I use the app to share my trip and location with one trusted contact so friends can follow progress.
I keep my phone charged and visible only when needed. That prevents me being left blind mid‑journey.
Waiting, privacy and night considerations
I wait indoors or in a lobby until the car arrives, especially at night. If I’m staying somewhere private, I ask the driver to pick me up or drop me off around the corner. That way people don’t learn my exact address or routine.
- Pre‑ride checklist: plate, driver name, who they’re collecting.
- Seat choice: back seat for distance and quick exit.
- App use: share trip with friends and keep phone topped up.
| Action | Why | Quick tip |
|---|---|---|
| Confirm plate & driver | Avoid wrong or rogue cars | Refuse to enter if mismatch |
| Wait indoors | Lower chance of hitching wrong ride | Use hotel lobbies or shops |
| Pick up around corner | Protect home address | Plan a clear meeting point |
Small checks like these improve overall safety and keep journeys calm and predictable.
Taxi safety when I have to hail one
When I need a taxi late at night I follow a short checklist before I get in. It keeps the journey calm and avoids awkward moments.
How I agree the price (and avoid the “scenic route”)
I ask for a flat rate where possible. If not, I confirm the meter is on and visible before I climb in.
I keep the destination open on my maps so I can spot big detours without accusing anyone. That way I can check the route quietly.
Why I prefer taxis booked via ranks or a hotel
I use a hotel or airport rank when I can. It reduces the chance of an unlicensed car and helps if there is a language issue.
Simple basics: seat belts, address cards and language barriers
I carry my place written in the local language on a card or screenshot. I also keep my bag and card close and the seat belt on.
- Say the price or ask to see the meter.
- Show your address card if pronunciation is hard.
- Keep money and cards tucked away until needed.
| Before entering | Why | Simple script |
|---|---|---|
| Agree fare or confirm meter | Avoid overcharging | “Flat rate to [hotel name]?” |
| Show address card | Fix place clearly | “This is the address, thank you” |
| Fast route visible on map | Spot detours quickly | “I’ll follow on my phone, thanks” |
Bus and coach safety, including keeping my bags and body safe
I treat buses and coaches as shared spaces: stay visible, keep an exit and hold what matters close.
Where I sit for personal protection
I choose a seat near the driver if I feel uneasy. It keeps me visible and makes help quick to reach.
I prefer an aisle seat, especially for women, because it gives a clear way out and avoids being cornered.
How I secure my backpack and luggage on crowded routes
In crowds my backpack comes to the front with zips facing inwards. I keep nothing valuable in outer pockets.
On longer trips I keep essentials with me—phone, cards and a small amount of cash—assuming anything stored under the coach can “walk”.
What I do if someone is inappropriate or threatening
If someone touches me or acts threatening, I move seats and speak up loudly. Saying, “Stop, do not touch me” draws attention fast.
I involve the driver or other people rather than freezing. Making it public often flips the power and encourages help.
- Seat choice: near driver, aisle for easy exit.
- Bag setup: backpack front, inward zips, valuables hidden.
- Response: move, speak clearly, involve driver or a group.
| Issue | Action I take | Why it works |
|---|---|---|
| Feeling watched | Move closer to driver or to a busier section | Visibility deters bad behaviour and speeds help |
| Crowded boarding | Bring backpack to front; keep hand on bag | Prevents snatches and keeps zips secure |
| Inappropriate touch | Call it out loudly; ask driver to stop | Draws people in and removes the abuser’s cover |
Train and underground safety in cities and across countries
Small choices on the train make a big difference to how secure and confident I feel.
Choosing carriages and seats that feel safer
I aim for a carriage with steady commuter density, good lighting and clear sightlines. That way I sit without being boxed in and can move if needed.
I often pick a middle car on longer routes. It can be safer in an accident and usually has balanced footfall.
When I move carriage immediately (no second-guessing)
If something feels off, I change carriages straight away. No second-guessing, no apology. Moving is quick and keeps me in control.
Trusting my instinct cuts the time I spend worrying. Other people rarely notice a quiet shift, so it’s low drama and effective.
Practical tips for platforms, doors, and keeping valuables close
I stand back from the edge and leave space around me where possible. When doors open, crowds surge—I watch the flow and find a steady spot.
Valuables stay zipped and front-facing. My phone is tucked away unless I need it, and nothing dangles where it can be grabbed.
- Pick: lit carriage with some commuters, not an empty one.
- Move: if you feel uneasy — change car, quickly and calmly.
- Keep: essentials on you for long-distance trains even if luggage is stored.
| Situation | Action | Why |
|---|---|---|
| Platform crowding | Stand clear of edge; find space | Reduces risk and lets you board calmly |
| Uneasy in a carriage | Move to next car immediately | Fast response avoids escalation |
| Storing luggage | Keep phone and documents on you | Prevents loss if overhead or racks are accessed |
Money, passport, and document safety on a solo trip
A small, split system for cash and cards means I can carry on if something goes missing. I keep things simple: what I carry each day, what stays locked away, and a clear plan if something goes wrong.
How I split cash and cards so one mistake doesn’t ruin my day
I never keep all my cash and every card in one place. I use a main card in a hidden pocket and a backup card in a separate pouch. I also have petty cash in a small coin purse for low‑value buys so I don’t flash my wallet.
ATM rules I follow (and why I avoid street machines)
I use ATMs inside banks or well‑lit branches. I avoid street machines at night and I stay aware of who’s nearby while I withdraw. If something feels off, I leave and find another machine.
Credit card safety: keeping the card in sight and using cash when unsure
I keep my card visible at the till and never let it be taken out of sight. If a payment setup looks dodgy, I pay with notes instead. Two cards and a small amount of cash cover most situations.
Passport handling: copies, storage, and why I never hand it over as a deposit
I carry a printed copy and an online scan of my passport. The original stays locked in my accommodation or a safe. I do not hand over my passport as a deposit for rentals or services.
Quick checklist
- With me: small coin purse, main card, backup card, phone, ID copy.
- Left in room: spare cash, extra card, scanned documents, emergency insurance details.
- If something goes wrong: cancel cards, use the spare, report theft to local police and insurer.
| Item | Where I keep it | Why |
|---|---|---|
| Main card | Hidden pocket on my person | Harder to steal and easy to access |
| Backup card | Separate pouch in luggage | Works if main card is lost or stopped |
| Petty cash (notes/coins) | Small purse for daily spending | Avoids showing a full wallet at tills |
| Passport (original) | Locked in accommodation safe | Protects identity and travel documents |
Online and social media safety while travelling
I pause before I post. A short delay stops me sharing a live position or exact plans with the whole world.
What I never post in real time (and why I delay tags)
I don’t post geotags or status updates while I’m still at a place. I wait until later in the day or when I’m home safe.
Boarding passes and other easy-to-miss data leaks
Screenshots of boarding passes, booking confirmations and QR codes hold personal data. I delete or crop them before sharing.
Public Wi‑Fi, VPNs and when I switch to mobile data
On public Wi‑Fi I use a VPN, turn off auto‑join and avoid banking. For logins and payments I switch to mobile data.
Avoiding juice jacking at public charging points
I carry my own plug and cable and avoid unknown USB ports. Using a power bank is an easy, safer option.
Privacy mindset: I treat posts like an address. I share specifics only with trusted people, not with every follower.
- Delay posts and location tags.
- Don’t share boarding passes or booking screens.
- Use VPN on public Wi‑Fi; switch to mobile data for sensitive tasks.
- Avoid public USB charging; use your own charger or power bank.
| Risk | What I avoid | What I do |
|---|---|---|
| Live geotags | Posting in real time | Delay posts by hours |
| Data leaks | Sharing boarding passes/screenshots | Crop or remove personal info before sharing |
| Unsecured Wi‑Fi | Logging into bank or email | Use VPN or mobile data |
| Juice jacking | Public USB ports | Use own plug/cable or power bank |
Apps and small gadgets that genuinely improve travel safety
The right mix of apps and compact kit keeps me connected and in control without overdoing it.

Track devices and items without becoming obsessive
I use Find My for devices and AirTags for luggage. Pairing is quick: open Find My, add item, name it and test the ping. An AirTag in a zipped pocket helps me know where a bag is if it goes missing.
Emergency apps and SOS setup
I install Trip Whistle Global SOS before I go so I have local emergency numbers at hand. I also set up SOS on my iPhone and Apple Watch: add emergency contacts and test the shortcut once at home.
Offline maps and power management
I download offline maps (Maps.me or similar) and pin three spots: my accommodation, main station and a backup café. I carry a power bank so my phone stays alive for navigation, bookings and help.
Small anti-theft extras I actually use
- Padlock for hostel lockers.
- Cable/loop lock to secure a bag on trains or buses.
- Portable door alarm for rentals or shared rooms.
| Tool | Use | Quick setup |
|---|---|---|
| Find My | Device tracking | Sign in with Apple ID, enable location sharing |
| AirTag | Track luggage | Pair in Find My, hide in zipped pocket |
| Trip Whistle | Local emergency numbers | Install, select country, save key contacts |
| Maps.me | Offline navigation | Download region, pin places |
Outdoor and adventure safety when I’m hiking or on the water
Before I set off on a hill or head into the sea, I ground my decisions in clear, simple checks. Outdoor life is often about humility: listen to briefings, read signs and assume warnings exist because someone was hurt before.
Listen, read and act
I pay attention to instructor briefings and local notices. If a sign says a route is closed, I treat that as a firm rule, not a suggestion.
Weather, lightning and knowing when to turn back
I check the forecast before the trip and watch the sky while I’m out. If storms or lightning look likely on exposed ground or water, I stop and return early.
Sea checks, rip currents and local advice
I ask lifeguards about currents and hazards and I don’t “chance it” because the water seems calm. Local people know common danger spots better than any map.
Float plan and kit I never skip
- I tell someone where I’ll be and when I’ll be back — then I stick to that plan.
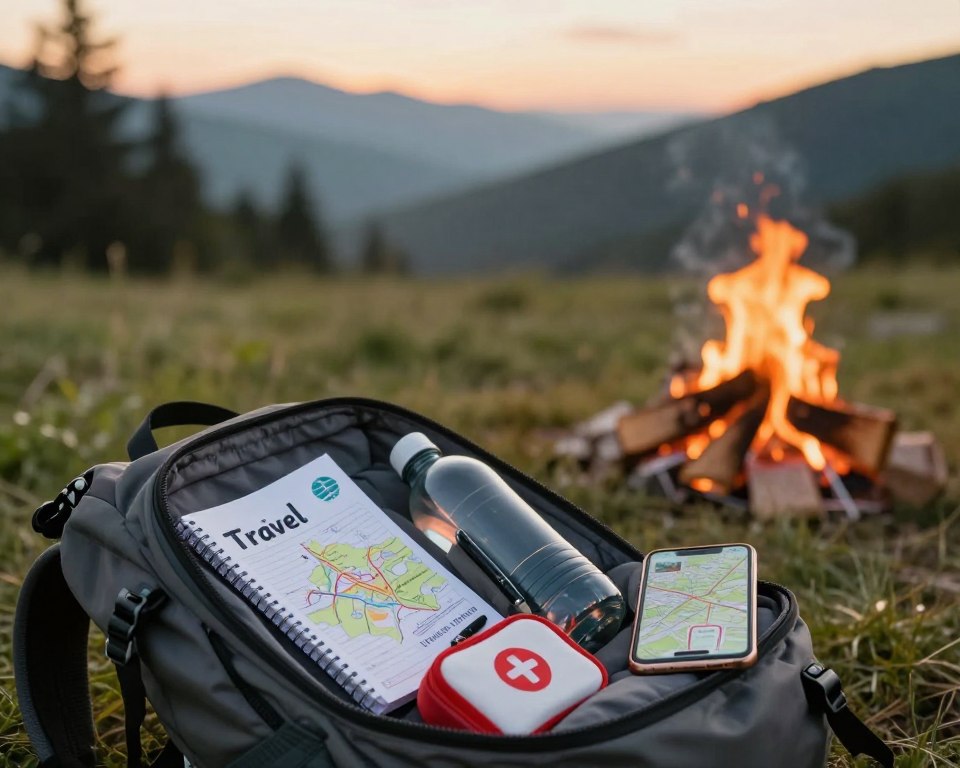
- I wear a life jacket or PFD when on open water and carry a first‑aid kit, enough water and a charged phone.
- For remote routes I often choose a group option; more people change the risk in a clear way.
| Item | Why | Quick action |
|---|---|---|
| Life jacket | Saves life in surprise swells | Wear before boarding |
| First‑aid kit | Treats cuts and blisters | Keep accessible in pack |
| Charged phone & power bank | Call help or check map | Top up before the day starts |
Conclusion
A short checklist before you leave turns uncertainty into routine. Plan your first journey, note local emergency numbers and keep copies of your passport and insurance where you can access them.
Keep valuables split: one card on your person, a backup in locked luggage, and a small amount of cash. Save key addresses offline on your phone and carry a printed copy in your bag.
After dark prefer a reputable taxi or app‑booked ride and choose seats on trains or buses near other people. Be friendly, not revealing—avoid live location posts and do not overshare that you are travelling alone.
Most problems vanish when you repeat a few simple habits. Make sure the basics are covered, trust your gut, and enjoy the trip with calm confidence.